C# Desktop Development Interview Questions and Answers (2026) – WinUI 3, .NET MAUI, Avalonia UI, Performance & Arhitecture

Welcome to the our .NET Interview Questions and Answers series exploring the ins and outs of C# and .NET! This part of C# / .NET interview questions and answers covering modern desktop development: WinUI 3, .NET MAUI, Avalonia UI, MVVM architecture with CommunityToolkit, performance optimization, data storage with EF Core and SQLite, secure credentials, background sync, MSIX packaging, and auto-update strategies. The Answers are split into sections: What 👼 Junior, 🎓 Middle, and 👑 Senior .NET engineers should know about a particular topic.
Also, please take a look at other articles in the series: C# / .NET Interview Questions and Answers
- Part 1: Core Language & Platform Fundamentals
- Part 2: Types and Type Features
- Part 3: Collections and Data Structures
- Part 4: Async & Parallel Programming
- Part 5: Design Patterns
- Part 6: ASP.NET Core
- Part 7: SQL Database
- Part 8: NoSQL Databases
- Part 9: Microservices and Distributed Systems
- Part 10: Testing
- Part 12: Mobile Development
- Part 13: AI
- Part 14: Agile & Scrum
WinUI 3 / Windows App SDK
❓ What is WinUI 3, and how does it differ from UWP and WPF?
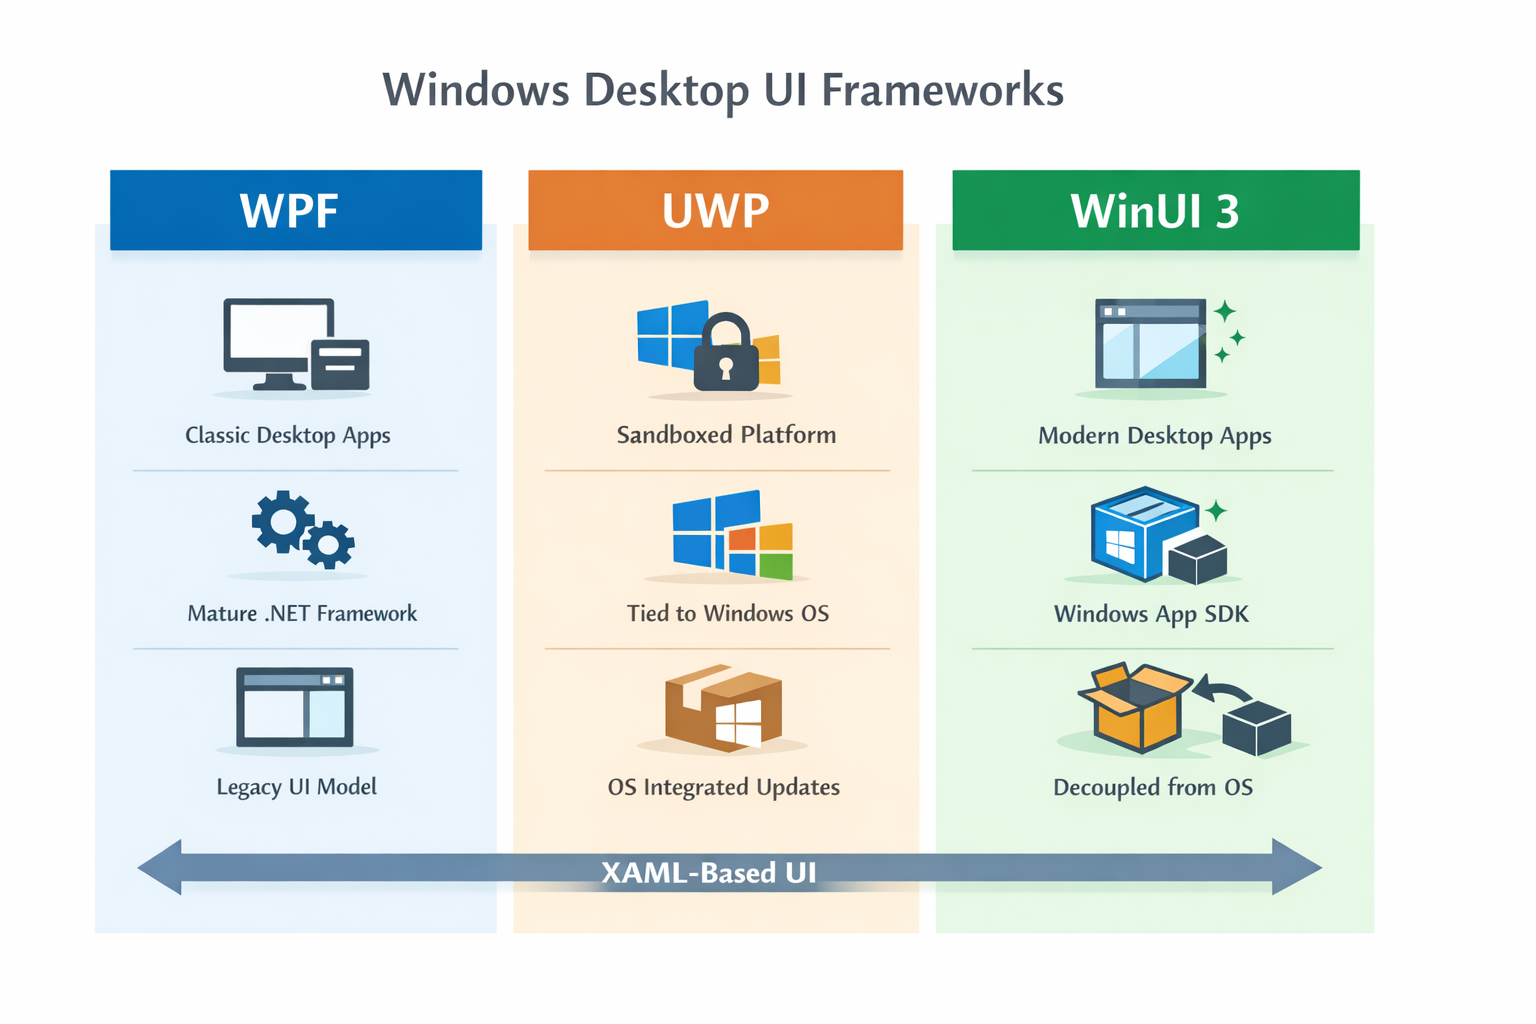
WinUI 3 is Microsoft’s modern UI framework for building native Windows desktop applications. It is part of the Windows App SDK and provides the latest Windows UI controls, Fluent Design styling, and modern windowing APIs while running as a regular desktop application.
The key idea behind WinUI 3 is decoupling the UI framework from the operating system. In UWP, UI components were shipped as part of Windows itself, which meant developers had to wait for OS updates to get new UI features. WinUI 3 ships independently via the Windows App SDK, so controls and UI features can evolve without requiring a Windows upgrade.
Compared to WPF, WinUI 3 provides a more modern, Windows-native look and integrates better with new Windows features (such as updated windowing APIs and Fluent UI components). WPF remains stable and widely used, but its rendering stack and styling model reflect older Windows UI design.
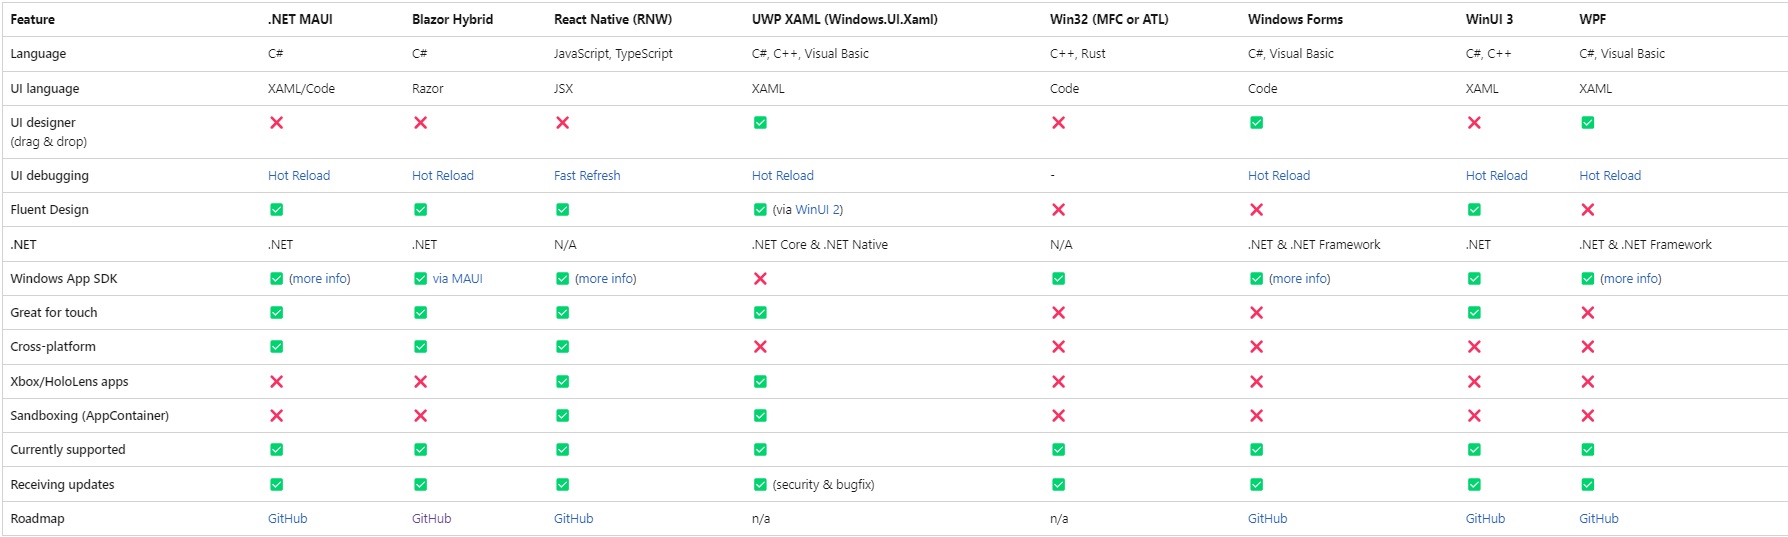
Comparison
What .NET engineers should know:
- 👼 Junior: WinUI 3 is Microsoft’s modern XAML UI framework for building Windows desktop apps.
- 🎓 Middle: WinUI 3 separates the UI framework from Windows itself, allowing UI features to ship independently through the Windows App SDK.
- 👑 Senior: Framework selection involves trade-offs: WPF offers maturity and ecosystem stability, while WinUI 3 provides modern Windows integration and future-facing UI capabilities.
📚 Resources:
- WinUI 3
- Build desktop apps for Windows
- Choosing the Right UI Framework for Native Windows Applications
❓ How do you implement drag-and-drop between your desktop app and the OS in WinUI 3 or WPF?
Drag-and-drop between a desktop app and the OS works through the OLE drag-and-drop protocol on Windows, the same mechanism used by File Explorer, Office, and every other Windows app. Both WPF and WinUI 3 wrap this protocol in XAML properties and events, but their API surfaces differ. The key concepts are the same: a drag source packages data into a DataPackage or IDataObjectThe OS routes it to the drop target, and the target reads the data in its understood format.
In WPF, drag-and-drop is enabled via AllowDrop, DragEnter, DragOver, and Drop events with DragDrop.DoDragDrop for initiating drags. In WinUI 3, the API is slightly higher level — CanDrag, DragStarting, and Drop events use DataPackage and DataPackageView which align with the UWP sharing model.
Example of accepting file drops from File Explorer in WinUI 3:
// XAML
// <Grid AllowDrop="True" DragOver="OnDragOver" Drop="OnDrop" />

private void OnDragOver(object sender, DragEventArgs e)
{
    e.AcceptedOperation = e.DataView.Contains(StandardDataFormats.StorageItems)
        ? DataPackageOperation.Copy
        : DataPackageOperation.None;
    e.DragUIOverride.Caption = "Drop files here";
}

private async void OnDrop(object sender, DragEventArgs e)
{
    if (!e.DataView.Contains(StandardDataFormats.StorageItems)) return;

    var items = await e.DataView.GetStorageItemsAsync();
    foreach (var item in items.OfType<StorageFile>())
        await ProcessFileAsync(item);
}
Example of accepting file drops in WPF:
// XAML
// <Grid AllowDrop="True" DragEnter="OnDragEnter" Drop="OnDrop" />

private void OnDragEnter(object sender, DragEventArgs e)
{
    e.Effects = e.Data.GetDataPresent(DataFormats.FileDrop)
        ? DragDropEffects.Copy
        : DragDropEffects.None;
    e.Handled = true;
}

private void OnDrop(object sender, DragEventArgs e)
{
    if (!e.Data.GetDataPresent(DataFormats.FileDrop)) return;

    var files = (string[])e.Data.GetData(DataFormats.FileDrop)!;
    foreach (var path in files)
        ProcessFile(path);
}
Example of initiating a drag from the app to File Explorer in WPF:
private void FileItem_MouseMove(object sender, MouseEventArgs e)
{
    if (e.LeftButton != MouseButtonState.Pressed) return;

    var data = new DataObject(DataFormats.FileDrop,
        new[] { SelectedFile.FullPath });

    DragDrop.DoDragDrop((DependencyObject)sender, data,
        DragDropEffects.Copy | DragDropEffects.Move);
}
WinUI 3 packaged apps face an additional friction point: file system access outside the package's sandbox requires broadFileSystemAccess capability declared in the manifest, or the app must use StorageFile APIs that go through the broker. Unpackaged WinUI 3 apps access dropped files as plain paths with no broker involved.
What .NET engineers should know:
- 👼 Junior: Set
AllowDrop="True"on the target element, handleDragOverto signal accepted operations, and read dropped file paths orStorageItemsin theDrophandler. - 🎓 Middle: Always set
e.Handled = trueinDragEnter/DragOverto prevent parent elements from overriding the drop effect, checkDataFormatsorStandardDataFormatsbefore reading data to avoid format mismatch exceptions, and test drag initiation to File Explorer separately from receiving drops — they exercise different code paths. - 👑 Senior: For packaged WinUI 3 apps, audit file system access requirements early —
StorageFilebroker access adds async overhead and path resolution complexity compared to plain Win32 paths in WPF or unpackaged apps, andbroadFileSystemAccessrequires Store review justification, which can delay submission.
📚 Resources:
❓ What is the Windows App SDK, and what problems does it solve over the classic Win32/UWP split?
The Windows App SDK is a set of libraries, frameworks, and APIs that Microsoft ships independently from the OS, giving desktop developers access to modern Windows platform features without being locked to a specific Windows version or app model. It packages WinUI 3, windowing, notifications, lifecycle management, and more into a unified SDK that works for both Win32 and previously UWP-style apps.
The classic problem it solves was a painful split: Win32/WPF apps had full desktop power but no access to modern WinRT APIs without awkward interop. UWP apps had modern APIs and Fluent controls but were constrained by sandbox restrictions, limited file system access, and Store-only distribution requirements. Developers had to choose between capability and modernity. The Windows App SDK collapses that distinction — the same NuGet package brings modern APIs to any desktop app regardless of how it's packaged.
// Accessing modern Windows notifications from a classic desktop app via Windows App SDK
var manager = AppNotificationManager.Default;
manager.Register();

var notification = new AppNotificationBuilder()
    .AddText("Build succeeded")
    .AddText("Your project compiled with 0 errors.")
    .BuildNotification();

manager.Show(notification);
A key design decision is the packaged-versus-unpackaged distinction. Packaged apps (MSIX) get a full API surface and identity; unpackaged apps get most features, but some APIs — like certain lifecycle hooks — require package identity. Understanding this boundary matters when planning deployment.
What .NET engineers should know:
- 👼 Junior: The Windows App SDK is what you install to build modern Windows apps with WinUI 3 — it's a NuGet package, not part of Windows itself.
- 🎓 Middle: Know the difference between packaged and unpackaged deployment and which APIs require package identity, as this directly impacts feature availability in production.
- 👑 Senior: The Windows App SDK shifts the Windows platform release cadence away from OS cycles — evaluate how this affects long-term support, versioning strategy, and backward compatibility guarantees for enterprise applications.
📚 Resources:
❓ How does the WinUI 3 threading model work, and how do you marshal UI updates from background threads?
WinUI 3 follows a Single-Threaded Apartment (STA) UI model — all UI elements are owned by the thread that created them and are backed by a DispatcherQueue tied to that thread. Attempting to update a control from a background thread throws an exception. This is conceptually similar to WPF's Dispatcher, but WinUI 3 uses DispatcherQueue from the Windows Runtime, which is more flexible and supports non-UI-thread queues.
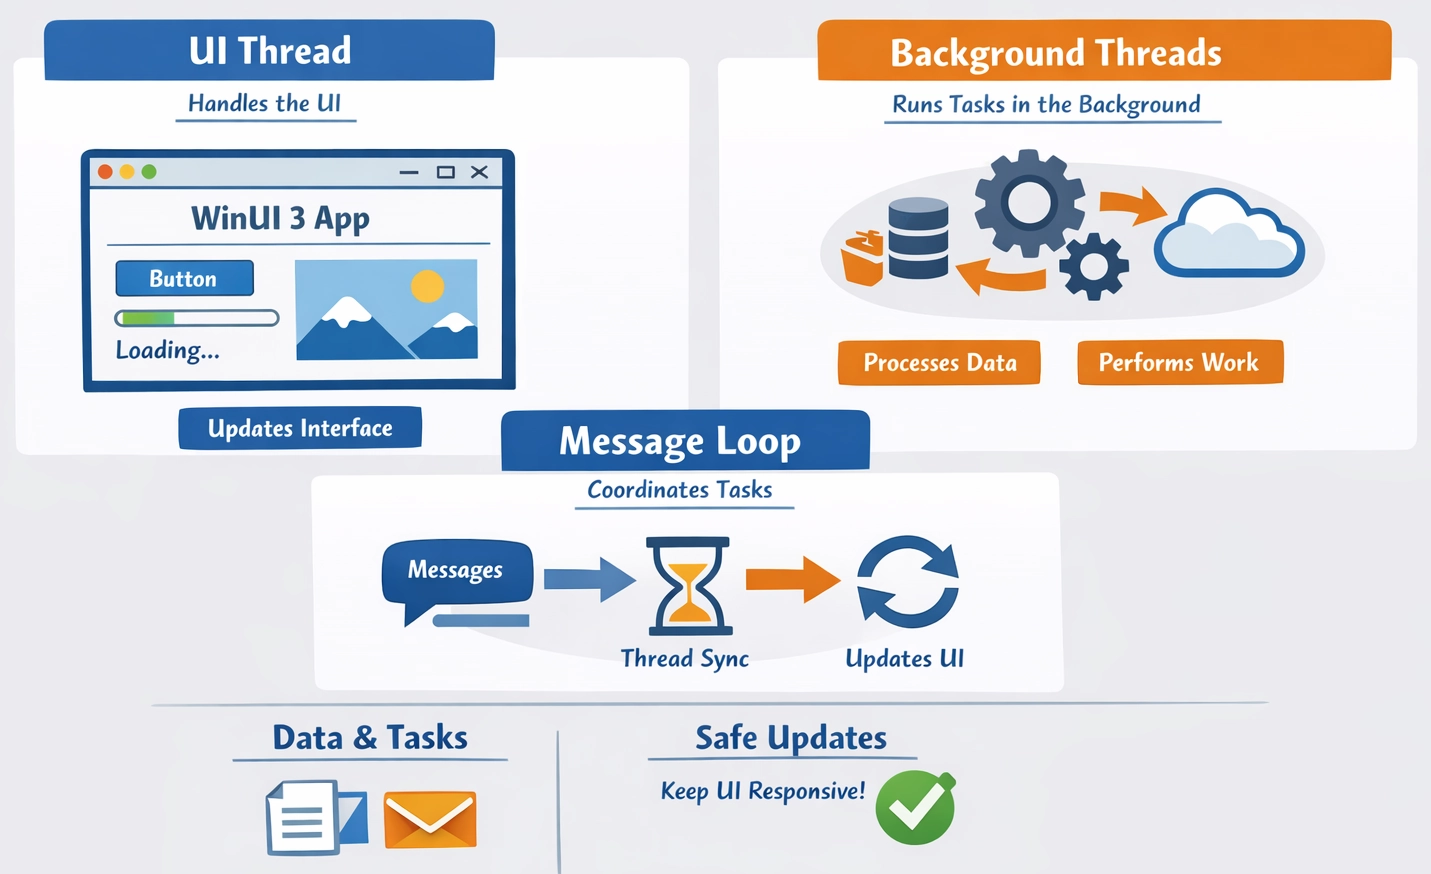
To marshal work back to the UI thread, you call DispatcherQueue.TryEnqueue() with the code to execute. In async workflows, the cleaner approach is to capture the DispatcherQueue before entering background work and use it when the result is ready. With async/await and Task-based code, if you're on the UI thread when you await, control typically returns to the UI thread automatically — but background threads started with Task.Run doesn't have that guarantee.
Example:
public sealed partial class MainWindow : Window
{
    private readonly DispatcherQueue _dispatcher;

    public MainWindow()
    {
        InitializeComponent();
        _dispatcher = DispatcherQueue.GetForCurrentThread();
    }

    private async void LoadDataButton_Click(object sender, RoutedEventArgs e)
    {
        var data = await Task.Run(() => FetchDataFromApi()); // background thread

        // Marshal back to UI thread
        _dispatcher.TryEnqueue(() =>
        {
            ResultTextBlock.Text = data;
        });
    }

    private async void LoadWithAwait_Click(object sender, RoutedEventArgs e)
    {
        // await on UI thread — resumes on UI thread automatically
        var data = await FetchDataAsync();
        ResultTextBlock.Text = data; // safe, no manual marshal needed
    }
}
The practical rule: capture DispatcherQueue on the UI thread, pass it into services or background workers that need to report progress, and call TryEnqueue when pushing results back. Avoid storing references to UI controls directly in background workers — pass data, not controls.
What .NET engineers should know:
- 👼 Junior: Never update UI controls from a background thread — use
DispatcherQueue.TryEnqueue()to marshal updates back to the UI thread. - 🎓 Middle: Understand that
async/awaitstarted on the UI thread returns to the UI thread automatically, butTask.Runcallbacks do not know when manual marshaling is required. - 👑 Senior: Design services to be UI-agnostic by using
IProgress<T>or observable streams (e.g., Rx) for progress reporting, keepingDispatcherQueueconcerns at the presentation layer rather than leaking into business logic.
📚 Resources:
❓ What is the XAML Islands feature, and when would you use it to migrate a WPF/WinForms app?
XAML Islands is a technology that lets you host modern WinUI controls inside a classic WPF or WinForms application. Instead of rewriting an entire legacy app to adopt WinUI 3, you embed individual modern controls — like InkCanvas, MapControl, or custom WinUI components — as islands within the existing app shell. The host app remains WPF or WinForms, while the embedded island renders through the WinRT XAML framework.
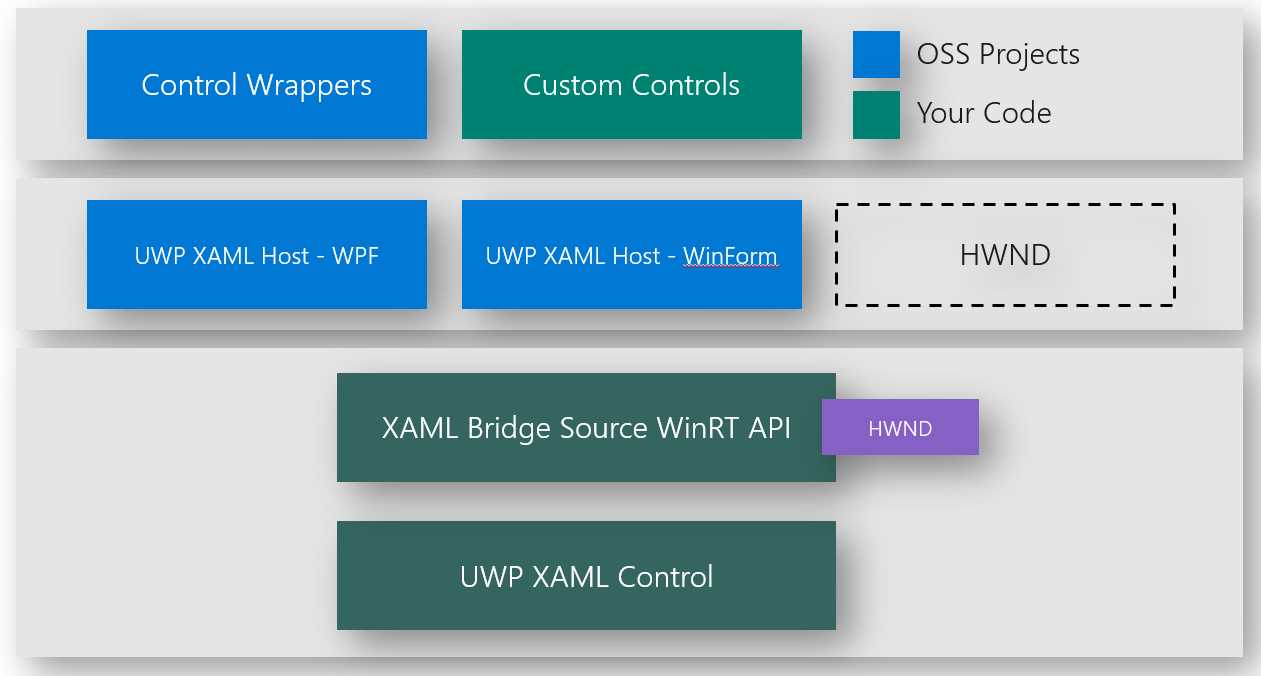
The primary use case is incremental migration. A large enterprise WPF app with years of business logic, custom controls, and complex layouts cannot realistically be rewritten in one shot. XAML Islands lets teams modernize high-visibility UI surfaces such as a settings page, a dashboard widget, or a media viewer — while leaving the rest of the app untouched. This reduces risk and delivers visible modernization without a full rewrite commitment.
Example:
// WPF host — embedding a WinUI 3 control via XAML Islands
// In the WPF .csproj, reference Microsoft.Xaml.Behaviors and WindowsAppSDK

// XAML side (WPF window)
// <xamlhost:WindowsXamlHost x:Name="XamlHost"
//     InitialTypeName="MyWinUIApp.MyModernControl"
//     Grid.Row="1" />

// Code-behind — accessing the hosted WinUI control
private void XamlHost_ChildChanged(object sender, EventArgs e)
{
    var host = (WindowsXamlHost)sender;
    var modernControl = host.GetUwpInternalObject() as MyModernControl;

    if (modernControl != null)
    {
        modernControl.DataContext = ViewModel;
    }
}
XAML Islands comes with real constraints worth understanding before committing: the hosted island runs in a separate XAML tree with its own focus, input, and accessibility scope. Keyboard navigation across the WPF/island boundary requires explicit handling, and drag-and-drop between the two trees is non-trivial. These friction points mean XAML Islands is best treated as a migration bridge, not a long-term architecture.
What .NET engineers should know:
- 👼 Junior: XAML Islands lets you add modern WinUI controls to an existing WPF or WinForms app without rewriting it from scratch.
- 🎓 Middle: Know that the integration friction of separating XAML trees means focus management, accessibility, and input handling across the boundary requires extra work and testing.
- 👑 Senior: Use XAML Islands as a tactical migration bridge with a defined end state, establish which surfaces get modernized, track the island footprint, and plan the eventual full migration to WinUI 3 to avoid permanent hybrid complexity.
📚 Resources:
❓ How do you handle packaging and deployment in WinUI 3?
WinUI 3 apps can ship in two deployment modes: packaged (MSIX) or unpackaged. Packaged apps are wrapped in an MSIX container — a modern Windows installer format that provides clean install/uninstall, automatic updates, sandboxed storage, and package identity. Unpackaged apps behave like classic Win32 executables — xcopy deployable, no installer required, but without the platform features that depend on package identity.
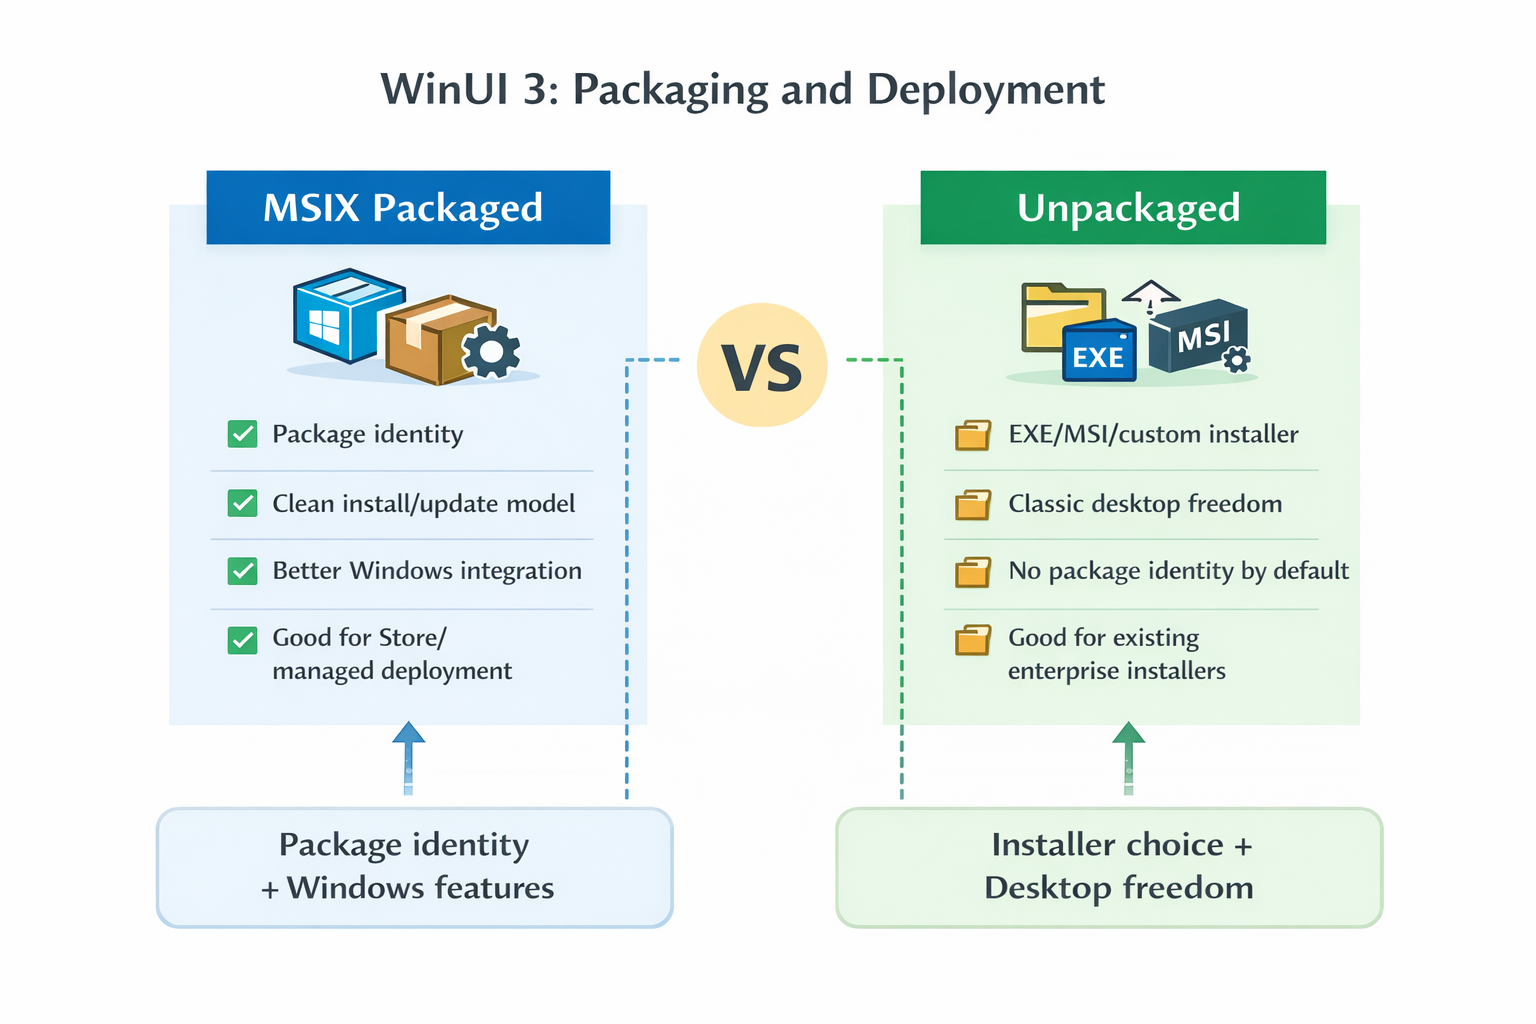
The choice has real API implications. Several Windows App SDK features — push notifications, certain lifecycle APIs, background tasks, and per-app settings isolation — require package identity to function. Packaged apps get these automatically; unpackaged apps either skip them or use workarounds such as the sparse package identity technique. For internal tooling or enterprise apps deployed via scripts, unpackaged is often simpler. For Store distribution or apps needing full Windows integration, MSIX is the right path.
MSIX packaging is handled through a Windows Application Packaging Project in Visual Studio, which wraps your WinUI 3 project and produces the .msix or .msixbundle artifact. CI/CD pipelines typically call msbuild with /p:Configuration=Release and sign the package with a certificate before distribution — self-signed for enterprise sideloading, trusted CA for Store submission.
What .NET engineers should know:
- 👼 Junior: Packaged (MSIX) apps install cleanly and support all Windows App SDK features; unpackaged apps are simpler to deploy but miss some platform integrations.
- 🎓 Middle: Know which APIs require package identity before committing to unpackaged deployment audit feature requirements early to avoid late-stage packaging surprises.
- 👑 Senior: Design the deployment model upfront as an architectural decision — evaluate Store vs. enterprise sideloading vs. unpackaged based on update cadence, IT policy, and required API surface, and automate MSIX signing and versioning in the CI/CD pipeline from day one.
📚 Resources:
- Grant package identity by packaging with an external location manually
- Package a desktop or UWP app in Visual Studio
- What is MSIX?
❓ How does WinUI 3 integrate with the Windows notification and lifecycle system?
WinUI 3 apps integrate with Windows notifications through the AppNotificationManager API from the Windows App SDK, which replaced the older ToastNotificationManager from WinRT. For packaged apps, registration is automatic via the app's package identity. For unpackaged apps, you must explicitly call AppNotificationManager.Default.Register() at startup and provide a COM activator to handle notification activation — the extra wiring needed because there's no package manifest to declare the activator for you.
Lifecycle integration works through the AppInstance API. WinUI 3 apps can register as single-instance, handle redirection when a second instance launches, and respond to activation events — protocol activations, file associations, notification clicks — all routed through AppInstance.GetActivatedEventArgs(). This replaces the fragmented UWP activation model and makes the same patterns available to packaged and unpackaged desktop apps.
// Program.cs — single instance + activation handling
[STAThread]
static void Main(string[] args)
{
    WinRT.ComWrappersSupport.InitializeComWrappers();

    var instance = AppInstance.FindOrRegisterForKey("main");

    if (!instance.IsCurrent)
    {
        // Redirect to existing instance and exit
        var activationArgs = AppInstance.GetCurrent().GetActivatedEventArgs();
        instance.RedirectActivationToAsync(activationArgs).AsTask().Wait();
        return;
    }

    instance.Activated += OnActivated;
    Application.Start(_ => new App());
}

private static void OnActivated(object sender, AppActivationArguments args)
{
    if (args.Kind == ExtendedActivationKind.Protocol)
    {
        var protocolArgs = args.Data as IProtocolActivatedEventArgs;
        // Handle deep link URI on the UI thread
        App.MainWindow.DispatcherQueue.TryEnqueue(() =>
            App.NavigateTo(protocolArgs.Uri));
    }
}
// App.xaml.cs — registering notifications with activation callback
protected override void OnLaunched(LaunchActivatedEventArgs args)
{
AppNotificationManager.Default.NotificationInvoked += OnNotificationInvoked;
AppNotificationManager.Default.Register();
var notification = new AppNotificationBuilder()
.AddText("Download complete")
.AddButton(new AppNotificationButton("Open")
.AddArgument("action", "open"))
.BuildNotification();
AppNotificationManager.Default.Show(notification);
}
private void OnNotificationInvoked(AppNotificationManager sender,
AppNotificationActivatedEventArgs args)
{
var action = args.Arguments["action"];
// Navigate or restore window based on action
}What .NET engineers should know:
- 👼 Junior: WinUI 3 apps use the Windows App SDK to send toast notifications and receive activation events when users interact with them.
- 🎓 Middle: Notifications typically trigger activation events that must be parsed to route the user to the correct UI state.
- 👑 Senior: Notification and lifecycle design should be centralized to avoid scattered activation logic and ensure consistent state restoration across launch scenarios.
📚 Resources:
.NET MAUI
❓ What is .NET MAUI, and how does it differ from Xamarin.Forms?
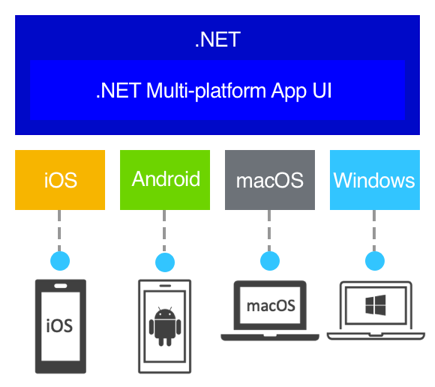
.NET MAUI (Multi-platform App UI) is the evolution of Xamarin.Forms. It is a cross-platform framework for creating native mobile and desktop apps with C# and XAML. While Xamarin was an "add-on" to .NET, MAUI is integrated into .NET 6+, meaning it uses the same SDK, libraries, and command-line tools as ASP.NET Core or Console apps.
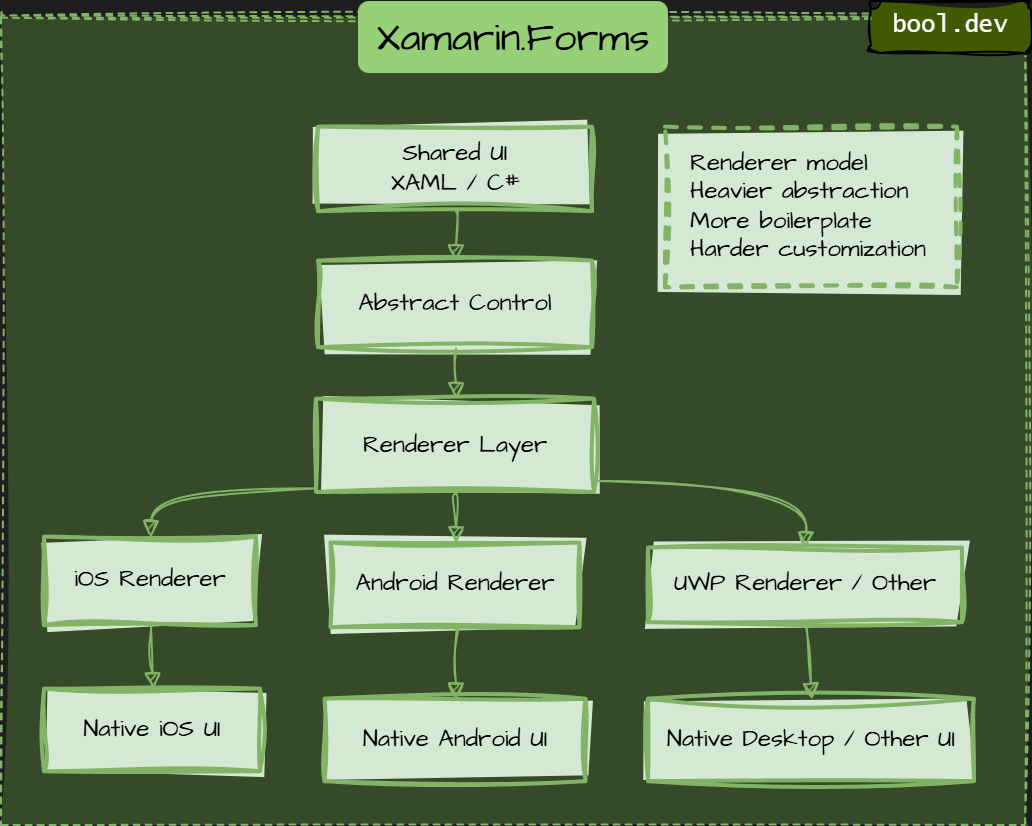
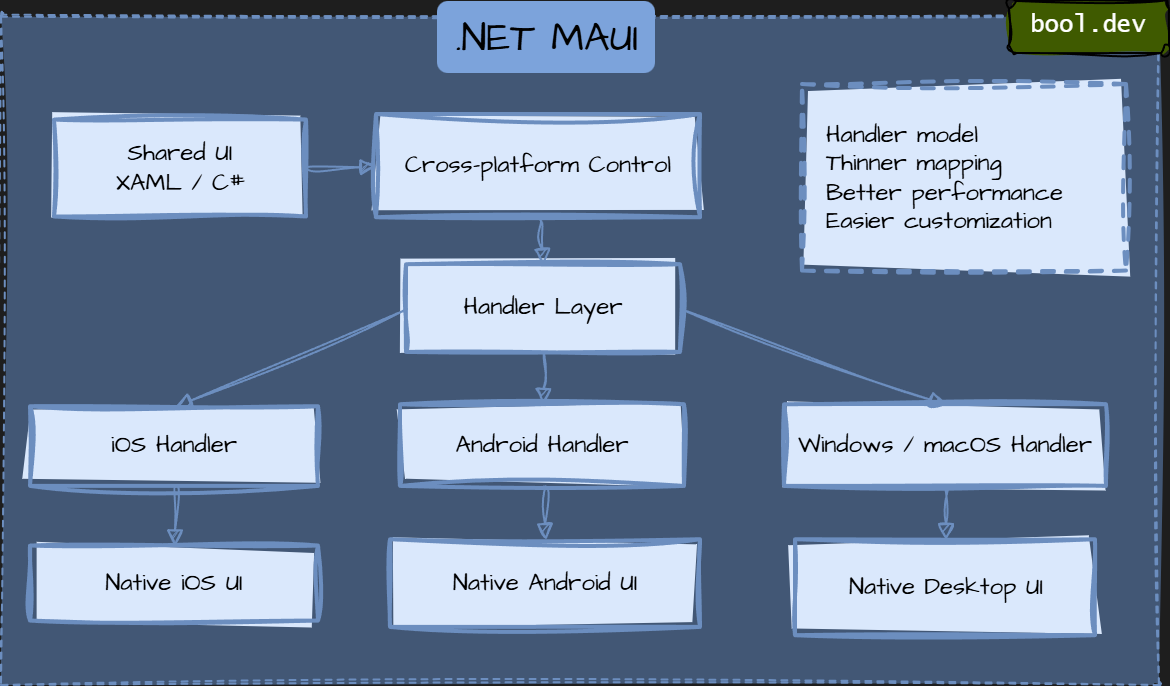
The architectural difference is significant. Xamarin.Forms rendered controls through platform renderers — a mapping layer that translated abstract controls to native ones, which caused inconsistencies and made customization painful. MAUI replaces renderers with a handlers architecture: thinner, faster, and designed for customization at any level without subclassing the entire renderer chain. Handlers cleanly separate the cross-platform control interface from the platform-specific implementation, making platform-specific tweaks surgical rather than structural.
MAUI also ships with Blazor Hybrid support out of the box — you can host a Blazor web UI inside a native MAUI shell, sharing web UI components between a browser app and a native app. This is a capability Xamarin.Forms never had and reflect MAUI's positioning as a unified native-plus-web story.
What .NET engineers should know:
- 👼 Junior: MAUI is the modern replacement for Xamarin.Forms — same XAML-based cross-platform concept, but unified into a single .NET project targeting Android, iOS, macOS, and Windows.
- 🎓 Middle: should focus on practical implementation: handling
NotificationInvoked, parsingArguments, dealing with app already running vs. cold launch. - 👑 Senior: Evaluate MAUI's maturity carefully for production use — assess handler gaps, platform-specific performance characteristics, and whether Blazor Hybrid fits the team's skill set better than pure native XAML for the target platforms.
📚 Resources:
❓ How does the .NET MAUI single project structure work across Android, iOS, Windows, and macOS?
The MAUI single project is a multi-targeted .csproj that compiles to different native runtimes depending on the target platform. Instead of maintaining four separate head projects as in Xamarin.Forms, everything lives in one project file with target framework monikers (TFMs) like net8.0-android, net8.0-ios, net8.0-maccatalyst, and net8.0-windows10.0.19041.0. The SDK handles the platform-specific compilation, linking, and packaging from that single source tree.
Platform-specific code is organized under a Platforms folder with subfolders per platform — Android, iOS, MacCatalyst, Windows. Files inside these folders are automatically included only when compiling for that platform, no build conditions required. For finer-grained platform branching inside shared code, conditional compilation symbols like #if ANDROID or #if IOS are available. Resources such as images, fonts, and raw assets are declared once in the project file, and MAUI's build system handles resizing and placement into the correct native asset pipeline for each platform.
Example of csproj for multi-targeting and shared resource declaration:
<Project Sdk="Microsoft.NET.Sdk">
  <PropertyGroup>
    <TargetFrameworks>
      net8.0-android;net8.0-ios;net8.0-maccatalyst;net8.0-windows10.0.19041.0
    </TargetFrameworks>
    <RootNamespace>MyApp</RootNamespace>
  </PropertyGroup>

  <!-- Single image declaration — MAUI generates all required resolutions -->
  <ItemGroup>
    <MauiImage Include="Resources\Images\logo.svg" BaseSize="128,128" />
    <MauiFont Include="Resources\Fonts\Inter.ttf" />
    <MauiSplashScreen Include="Resources\Splash\splash.svg" Color="#FFFFFF" />
  </ItemGroup>
</Project>
Android-specific entry, auto-scoped to Android TFM
// Platforms/Android/MainActivity.cs — Android-specific entry, auto-scoped to Android TFM
[Activity(Theme = "@style/Maui.SplashTheme", MainLauncher = true)]
public class MainActivity : MauiAppCompatActivity { }

// Platforms/iOS/AppDelegate.cs — iOS-specific entry
[Register("AppDelegate")]
public class AppDelegate : MauiUIApplicationDelegate
{
    protected override MauiApp CreateMauiApp() => MauiProgram.CreateMauiApp();
}

// Shared MauiProgram.cs — single composition root for all platforms
public static class MauiProgram
{
    public static MauiApp CreateMauiApp()
    {
        var builder = MauiApp.CreateBuilder();
        builder
            .UseMauiApp<App>()
            .ConfigureFonts(fonts =>
            {
                fonts.AddFont("Inter.ttf", "InterRegular");
            });

        builder.Services.AddSingleton<IDataService, DataService>();
        return builder.Build();
    }
}
The MauiProgram.cs file acts as the single composition root across all platforms — dependency injection, service registration, and middleware configuration happen here once and apply everywhere. Platform entry points like MainActivity and AppDelegate are thin shells that simply call into MauiProgram, keeping bootstrap logic from scattering across platform folders.
What .NET engineers should know:
- 👼 Junior: One project targets all platforms via multiple TFMs — shared code lives at the root, platform-specific code goes in the
Platformsfolder and is automatically included only for the relevant platform build. - 🎓 Middle: Understand how
MauiProgram.csserves as the unified DI composition root and how the build system handles asset pipeline differences — image resizing, font embedding, and splash screens are all declared once and handled per platform by the SDK. - 👑 Senior: Manage multi-platform build complexity proactively — establish clear conventions for when to use
Platformsfolders vs.#ifdirectives vs. interface abstractions, and ensure CI pipelines build and test all TFMs independently to catch platform-specific regressions early.
📚 Resources:
❓ What are MAUI Handlers, and how do they replace Xamarin.Forms Renderers?
MAUI Handlers are the mechanism .NET MAUI uses to connect cross-platform UI controls to the underlying native platform controls. They replace the Renderer architecture used in Xamarin.Forms. The goal is the same — to map a cross-platform control like Button or Entry to the native control (UIButton, Android.Widget.Button, etc.) — but the design is simpler, faster, and easier to extend.
In Xamarin.Forms, each control, a renderer class per platform was required that inherited from a base renderer and handled lifecycle events (OnElementChanged, property changes, etc.). This often resulted in deep inheritance chains and large renderer classes. MAUI replaces that with handlers, which use a lightweight mapping system where properties and commands are connected directly to native platform APIs.
Example of a simple handler mapping that connects a MAUI control property to a native view property:
public class MyButtonHandler : ButtonHandler
{
    public static IPropertyMapper<Button, MyButtonHandler> Mapper =
        new PropertyMapper<Button, MyButtonHandler>(ButtonHandler.Mapper)
        {
            [nameof(Button.Text)] = MapText
        };

    public MyButtonHandler() : base(Mapper) { }

    public static void MapText(MyButtonHandler handler, Button view)
    {
        handler.PlatformView.Text = view.Text;
    }
}
Instead of overriding lifecycle methods, MAUI handlers define explicit mappings between properties and the native control. This reduces overhead and makes it easier to customize behavior.
What .NET engineers should know:
- 👼 Junior: Handlers map MAUI UI controls to native platform controls and replace Xamarin.Forms renderers.
- 🎓 Middle: Instead of inheritance-heavy renderer classes, handlers use property and command mappings for better performance and maintainability.
- 👑 Senior: Handlers reduce abstraction layers, improve startup performance, and make platform customization easier while keeping cross-platform UI logic clean.
📚 Resources: Handlers
❓ How does .NET MAUI implement dependency injection, and what is the MauiAppBuilder lifecycle?
MAUI uses the same Microsoft.Extensions.DependencyInjection container as ASP.NET Core, making the DI pattern consistent across the entire .NET ecosystem. Services, pages, and ViewModels are registered in MauiProgram.cs via MauiAppBuilder, which acts as the single composition root before the app launches. Pages and handlers are automatically resolved by the container when navigated to, provided they're registered.
The MauiAppBuilder lifecycle flows linearly: create the builder, register services and handlers, configure fonts and platform specifics, then call Build() to produce the immutable MauiApp. After Build(), the container is sealed — no further registrations are possible.
Example of service registration and MauiApp composition:
public static class MauiProgram
{
    public static MauiApp CreateMauiApp()
    {
        var builder = MauiApp.CreateBuilder();

        builder
            .UseMauiApp<App>()
            .ConfigureFonts(fonts =>
                fonts.AddFont("Inter.ttf", "InterRegular"));

        // Services
        builder.Services.AddSingleton<IDataService, DataService>();
        builder.Services.AddTransient<MainPageViewModel>();
        builder.Services.AddTransient<MainPage>();

        return builder.Build();
    }
}
Example of injecting a ViewModel into a Page via a constructor:
public partial class MainPage : ContentPage
{
    public MainPage(MainPageViewModel viewModel)
    {
        InitializeComponent();
        BindingContext = viewModel;
    }
}
Constructor injection works naturally for pages and services. Avoid App.Current.Handler.MauiContext.Services as a service locator — it couples code to the app infrastructure and makes testing harder.
What .NET engineers should know:
- 👼 Junior: Register pages, ViewModels, and services in
MauiProgram.csand use constructor injection — the same pattern as ASP.NET Core. - 🎓 Middle: Know lifetime semantics —
AddSingletonfor shared state,AddTransientfor pages, and ViewModels to avoid stale state across navigation. - 👑 Senior: Avoid service locator patterns, keep
MauiProgram.csclean by splitting registrations into extension methods, and ensure ViewModels are independently testable without the MAUI host.
📚 Resources:
❓ What is the Shell navigation model in MAUI, and how does it compare to manual navigation stacks?
MAUI Shell provides a top-level navigation host that handles routing, flyout menus, tab bars, and URI-based navigation in one unified structure. Instead of manually pushing and popping pages on a NavigationPage stack, Shell lets you define the app's navigation hierarchy declaratively in XAML and navigate by route string. This makes deep linking, back-stack management, and passing parameters significantly cleaner than manual stack navigation.
Manual navigation via Navigation.PushAsync() works but becomes fragile in complex apps — pages hold direct references to each other, deep linking is hard to implement, and passing data between pages usually devolves into constructors or static state. Shell solves this by decoupling navigation intent from page construction.
Example of defining Shell routes in AppShell.xaml:
<Shell>
    <FlyoutItem Title="Home" Icon="home.png">
        <ShellContent Route="home" ContentTemplate="{DataTemplate pages:HomePage}" />
    </FlyoutItem>
    <ShellContent Route="details" ContentTemplate="{DataTemplate pages:DetailsPage}" />
</Shell>
Example of registering and navigating to a route with parameters:
// MauiProgram.cs — register route not declared in Shell XAML
Routing.RegisterRoute("product/details", typeof(ProductDetailsPage));

// Navigate with query parameters from anywhere
await Shell.Current.GoToAsync("product/details?id=42");

// Receive in target page via QueryProperty
[QueryProperty(nameof(ProductId), "id")]
public partial class ProductDetailsPage : ContentPage
{
    public string ProductId { get; set; }
}
Shell also handles back navigation consistently across platforms via GoToAsync(".."), which pops the current route without the page needing to know its parent.
What .NET engineers should know:
- 👼 Junior: Use Shell for new MAUI apps — define routes in XAML and navigate with
GoToAsync()instead ofPushAsync(). - 🎓 Middle: Understand absolute vs. relative routes —
//homeresets the stack whiledetailspushes onto it, and passing complex objects requiresGoToAsyncoverloads withShellNavigationQueryParameters. - 👑 Senior: Shell simplifies navigation architecture, but evaluates its constraints for complex apps — nested tabs with independent stacks or custom transitions may require hybrid approaches combining Shell with manual navigation in specific flows.
📚 Resources:
❓ How do you handle platform-specific code in MAUI using partial classes and platform folders?
MAUI offers two clean mechanisms for platform-specific code: the Platforms folder for fully platform-scoped files, and partial classes for splitting a shared interface from its platform implementations. Files inside Platforms/Android, Platforms/iOS etc. are automatically included only in the matching TFM build — no #if directives or build conditions needed. For code with a shared contract but different implementations per platform, partial classes let you define the interface once and implement it separately in each platform folder.
Overusing #if ANDROID / #if IOS Blocks in shared code are a common anti-pattern — they make files harder to read and test. Partial classes and platform folders push that complexity to the edges where it belongs.
Example of a partial class split across shared and platform folders:
// Shared — DeviceService.cs (root folder)
public partial class DeviceService
{
    public partial string GetDeviceModel();
}

// Platforms/Android — DeviceService.cs
public partial class DeviceService
{
    public partial string GetDeviceModel() =>
        Android.OS.Build.Model ?? "Unknown";
}

// Platforms/iOS — DeviceService.cs
public partial class DeviceService
{
    public partial string GetDeviceModel() =>
        UIKit.UIDevice.CurrentDevice.Model ?? "Unknown";
}
Example of registering and consuming the platform service via DI:
// MauiProgram.cs
builder.Services.AddSingleton<DeviceService>();

// Shared ViewModel — no platform knowledge
public class InfoViewModel
{
    private readonly DeviceService _device;
    public InfoViewModel(DeviceService device) => _device = device;
    public string Model => _device.GetDeviceModel();
}
For cases where platforms differ enough to warrant entirely separate files with no shared contract, such as custom camera pipelines or NFC handling, a plain interface with platform-specific implementations registered via DI is cleaner than partial classes.
What .NET engineers should know:
- 👼 Junior: Put platform-specific code in the
Platformsfolder — files there are automatically excluded from other platform builds without any#ifneeded. - 🎓 Middle: Use partial classes when a feature has a shared signature but divergent platform implementations — it keeps the shared code surface clean while containing platform logic at the edges.
- 👑 Senior: Establish a clear convention across the team — prefer interfaces and DI over partial classes for anything requiring unit testing, and reserve partial classes for lightweight platform utilities that don't need mocking.
📚 Resources:
❓ What are MAUI Essentials, and what categories of native device APIs do they expose?
MAUI Essentials is a set of cross-platform APIs built directly into .NET MAUI that expose native device capabilities through a unified interface. Unlike Xamarin.Essentials which was a separate NuGet package, MAUI Essentials ships as part of the framework — no extra installation needed. Each API abstracts platform differences behind a consistent .NET interface, so geolocation, accelerometer, or clipboard access works the same way regardless of whether the app runs on Android, iOS, or Windows.
The APIs are grouped into functional categories: device info and display (DeviceInfo, DeviceDisplay), sensors (Accelerometer, Gyroscope, Compass, Barometer), connectivity (Connectivity, NetworkAccess), storage (Preferences, SecureStorage, FileSystem), communication (Email, Sms, PhoneDialer), and platform utilities (Clipboard, Browser, Share, Launcher, Permissions).
Example of checking connectivity and reading device info:
var access = Connectivity.Current.NetworkAccess;
if (access != NetworkAccess.Internet)
{
    await DisplayAlert("Offline", "No internet connection.", "OK");
    return;
}

var model = DeviceInfo.Current.Model;
var platform = DeviceInfo.Current.Platform;
Example of requesting permissions and accessing geolocation:
var status = await Permissions.RequestAsync<Permissions.LocationWhenInUse>();
if (status != PermissionStatus.Granted) return;

var location = await Geolocation.Default.GetLocationAsync(
    new GeolocationRequest(GeolocationAccuracy.Medium));

Console.WriteLine($"Lat: {location?.Latitude}, Lng: {location?.Longitude}");
Permission handling is an integral part of Essentials — most hardware APIs require explicit permission requests before access, and the Permissions API unifies the Android manifest + runtime request and iOS Info.plist flows into a single call.
What .NET engineers should know:
- 👼 Junior: MAUI Essentials gives you cross-platform access to device hardware and OS features — geolocation, sensors, clipboard, and more — without writing any platform-specific code.
- 🎓 Middle: Always check and request permissions before accessing hardware APIs, and handle
FeatureNotSupportedExceptionfor APIs unavailable on specific platforms or devices. - 👑 Senior: Wrap Essentials APIs behind interfaces for testability — static access patterns like
Geolocation.Defaultcouple of ViewModels to hardware, making unit testing impossible without abstraction.
📚 Resources: .NET MAUI Platform features
❓ How does .NET MAUI handle hot reload, and what are its current limitations?
MAUI supports two reload mechanisms: XAML Hot Reload and .NET Hot Reload. XAML Hot Reload updates UI layout and styles instantly on the running app when XAML files are saved — no recompile needed, changes appear on the device or emulator in seconds. .NET Hot Reload applies C# code changes at runtime, covering method body edits without restarting the app. Both work in Visual Studio and VS Code with the MAUI extension and are aimed at tightening the UI iteration loop.
The limitations are real and worth knowing before relying on them heavily. XAML Hot Reload breaks when structural changes are made — adding new controls with new bindings, changing control hierarchies, or modifying ResourceDictionary entries often requires a full rebuild. .NET Hot Reload does not support adding new methods, changing method signatures, modifying constructors, or altering class structure — only method body changes qualify. Neither mechanism works reliably on physical iOS devices without additional configuration, and both can silently fall back to a full restart without clear feedback.
Example of a change that works with XAML Hot Reload:
<!-- Changing text, color, margin — reloads instantly -->
<Label Text="Welcome"
       TextColor="DarkBlue"
       Margin="0,20,0,0"
       FontSize="24" />
Example of a change that breaks XAML Hot Reload and requires a rebuild:
<!-- Adding a new binding or new named element forces full restart -->
<Entry x:Name="NewSearchBox"
       Text="{Binding SearchQuery}"
       Placeholder="Search..." />
For reliable iteration on complex UI, structuring pages into small reloadable components reduces the surface area that triggers full restarts.
What .NET engineers should know:
- 👼 Junior: Save XAML files to see UI changes instantly via Hot Reload, but expect a full restart when adding new bindings or restructuring the control tree.
- 🎓 Middle: Know the boundaries of .NET Hot Reload method body edits apply live, but structural C# changes like new properties or constructor modifications always require a restart.
- 👑 Senior: Don't architect iteration workflows around Hot Reload reliability. Build small, focused pages and ViewModels so full restarts remain fast, and treat Hot Reload as a convenience rather than a guaranteed development contract.
📚 Resources: XAML Hot Reload for .NET MAUI
❓ How do you optimize MAUI app startup time and reduce cold-launch latency?
Cold-launch latency in MAUI comes from several compounding costs: the .NET runtime initializing, the DI container building, XAML parsing the first page, and platform-specific bootstrapping. Optimizing startup means attacking each layer independently rather than treating it as one monolithic problem.
The biggest wins come from trimming the DI registration cost and deferring work that doesn't need to happen before the first frame renders. Registering dozens of services eagerly, loading data in page constructors, or initializing SDKs synchronously in MauiProgram.cs all block the UI thread before the user sees anything. Moving non-critical initialization to a background task after first render — sometimes called "lazy bootstrap" — keeps the shell visible fast.
Example of deferring heavy initialization after first render:
public partial class App : Application
{
    protected override Window CreateWindow(IActivationState state)
    {
        var window = new Window(new AppShell());

        window.Created += async (s, e) =>
        {
            await Task.Run(() => HeavySdkInitializer.Initialize());
        };

        return window;
    }
}
Example of using startup tracing to AOT-compile hot paths (Android):
<!-- Android .csproj — enable startup tracing for faster cold launch -->
<PropertyGroup Condition="'$(Configuration)' == 'Release'">
    <AndroidEnableProfiledAot>true</AndroidEnableProfiledAot>
    <AndroidUseDefaultAotProfile>true</AndroidUseDefaultAotProfile>
</PropertyGroup>
On iOS, enabling NativeAOT or full AOT compilation removes JIT warmup entirely at the cost of larger binary size. On Android, startup tracing profiles the hot paths during a training run and AOT-compiles only those, balancing startup speed against binary size growth.
Trimming unused assemblies via PublishTrimmed also reduces startup cost — the linker removes unreachable code, shrinking what the runtime loads. Combined with UseInterpreter=false in release builds, this produces measurably faster cold launches.
What .NET engineers should know:
- 👼 Junior: Avoid loading data or running logic in page constructors — the constructor should only wire up bindings, with data loading deferred to
OnAppearing. - 🎓 Middle: Profile startup with platform tools (Android Studio CPU profiler, Xcode Instruments) before optimizing — identify whether the bottleneck is DI registration, XAML parsing, or SDK initialization.
- 👑 Senior: Apply startup tracing and AOT profiles in release builds, audit DI registrations for unnecessary eager initialization, and establish a startup time budget enforced in CI to prevent regression.
📚 Resources:
❓ What strategies exist for sharing code between MAUI and a web/API project in the same solution?
The core strategy is extracting shared logic into class libraries that neither MAUI nor the web project owns. A typical solution splits into three layers: a shared core library (domain models, DTOs, interfaces, validation logic), platform-specific projects (MAUI app, ASP.NET Core API), and, optionally, a shared client library that wraps HTTP calls. The shared library targets netstandard2.0 or net8.0 with no platform dependencies, making it consumable by any project type.
The most valuable areas to share are DTOs and validation. Defining request/response models once eliminates the most common source of client/server drift — a property renamed on the API but not updated in the mobile client. Sharing FluentValidation rules means the same validation logic runs on both the MAUI client before submission and the API server on receipt.
Example of a shared class library consumed by both MAUI and API:
// Shared/Models/ProductDto.cs — referenced by both projects
public record ProductDto(int Id, string Name, decimal Price);

// Shared/Interfaces/IProductService.cs
public interface IProductService
{
    Task<IEnumerable<ProductDto>> GetProductsAsync();
}

// MAUI implements via HTTP, API implements via EF Core
Example of sharing an HTTP client implementation as a standalone library:
// Shared/ApiClient/ProductApiClient.cs
public class ProductApiClient : IProductService
{
    private readonly HttpClient _http;
    public ProductApiClient(HttpClient http) => _http = http;

    public async Task<IEnumerable<ProductDto>> GetProductsAsync()
    {
        return await _http.GetFromJsonAsync<IEnumerable<ProductDto>>("api/products")
            ?? Enumerable.Empty<ProductDto>();
    }
}
Blazor Hybrid is worth considering when the team already has Blazor web UI — MAUI can host Blazor components directly via BlazorWebView, meaning UI components built for the web render inside the native MAUI shell with zero duplication. This works best when the web UI is the primary surface and native device integration needs are limited.
What .NET engineers should know:
- 👼 Junior: Extract DTOs and interfaces into a separate class library, both MAUI and API projects reference it, keeping models in sync automatically.
- 🎓 Middle: Share the HTTP client implementation as a library registered via DI in MAUI, which keeps API communication logic out of ViewModels and reusable across platforms.
- 👑 Senior: Evaluate Blazor Hybrid as a deliberate architecture decision, not a default. It maximizes UI reuse but couples the MAUI app to the web rendering model, which adds complexity when deep native integration is needed.
📚 Resources: .NET class libraries
Avalonia UI
![Avalonia UI]](https://files.bool.dev/site/blog/456ffd59-fd47-4e09-8f3e-b54019f41f17/195dd5ba-894b-43ac-b498-9697a511ce08.png)
❓ What is Avalonia UI, and what makes it a viable cross-platform desktop alternative to WPF?
Avalonia UI is an open-source, cross-platform XAML-based UI framework that runs on Windows, Linux, macOS, iOS, Android, and WebAssembly. Unlike WPF, which is Windows-only and tied to the Windows rendering stack, Avalonia has its own rendering engine built on Skia (and optionally Direct2D on Windows), meaning it draws every pixel itself rather than delegating to native controls. This gives it pixel-perfect consistency across platforms — the app looks and behaves identically everywhere.
For WPF developers, Avalonia is the most natural migration path. It uses a XAML dialect deliberately close to WPF's, supports styles, control templates, data binding, INotifyPropertyChanged, ICommand, and MVVM patterns in a way that feels familiar. The key differences are Avalonia's StyledProperty system replacing WPF's DependencyProperty, and its Styles system, which is CSS-inspired and more composable than WPF's resource-based styling.
Example of an Avalonia window with data binding familiar to WPF developers:
<Window xmlns="https://github.com/avaloniaui"
        Title="{Binding Title}">
    <StackPanel Margin="16">
        <TextBlock Text="{Binding WelcomeMessage}" FontSize="20"/>
        <Button Command="{Binding LoadCommand}" Content="Load Data"/>
        <ListBox ItemsSource="{Binding Items}"/>
    </StackPanel>
</Window>
Example of Avalonia's styled property — replacing WPF DependencyProperty:
public class CustomControl : Control
{
    public static readonly StyledProperty<string> LabelProperty =
        AvaloniaProperty.Register<CustomControl, string>(nameof(Label));

    public string Label
    {
        get => GetValue(LabelProperty);
        set => SetValue(LabelProperty, value);
    }
}
Avalonia's renderer-owns-everything approach is a double-edged sword — pixel-perfect consistency comes at the cost of native control accessibility and OS integration. Screen readers, IME input, and platform-specific accessibility trees require more work than frameworks that delegate to native widgets.
What .NET engineers should know:
- 👼 Junior: Avalonia lets you build WPF-style XAML apps that run on Windows, Linux, and macOS — useful when cross-platform desktop reach matters.
- 🎓 Middle: Understand that Avalonia renders everything via Skia rather than native controls — UI consistency is excellent, but native accessibility and OS widget integration require explicit attention.
- 👑 Senior: Evaluate Avalonia against MAUI for desktop targets — Avalonia owns more of the rendering pipeline, giving tighter control and better Linux support, while MAUI leans on native controls and better suits teams targeting mobile alongside desktop.
📚 Resources:
❓ How does Avalonia's rendering pipeline differ from WPF and WinUI 3?
Avalonia's fundamental architectural difference is that it owns its entire rendering pipeline. While WPF delegates to DirectX through milcore and WinUI 3 uses the Windows Composition engine, Avalonia renders through its own compositor, backed by Skia (or optionally Direct2D and Metal), and runs on any platform, Windows, Linux, macOS, without depending on OS-provided UI primitives. Controls are drawn entirely by Avalonia; there are no native widgets underneath.
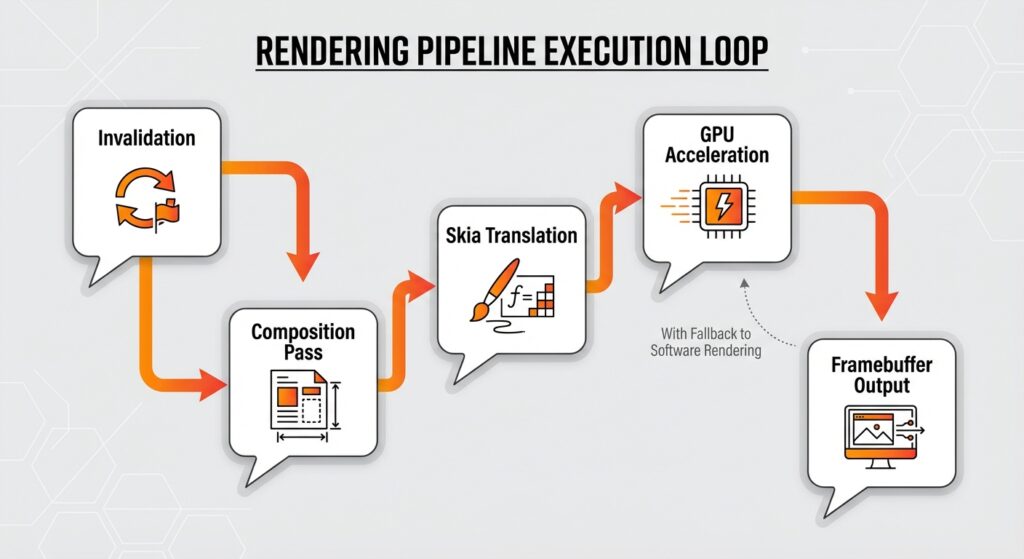
WPF's rendering is Windows-only and tightly coupled to DirectX 9-era infrastructure, which is why GPU-accelerated effects are limited, and the visual layer feels dated. WinUI 3 uses the modern Windows Visual Layer (DirectComposition), which provides smooth animations and proper HDR support, but it's Windows-exclusive. Avalonia's Skia backend runs identically everywhere, which is its primary advantage for cross-platform desktop — the UI looks and behaves the same on all platforms rather than adapting to native widgets.
Example of Avalonia's composition rendering with GPU-accelerated custom control:
public class GradientPanel : Control
{
    public override void Render(DrawingContext context)
    {
        var brush = new LinearGradientBrush
        {
            StartPoint = new RelativePoint(0, 0, RelativeUnit.Relative),
            EndPoint   = new RelativePoint(1, 1, RelativeUnit.Relative),
            GradientStops =
            {
                new GradientStop(Colors.DodgerBlue, 0),
                new GradientStop(Colors.MediumPurple, 1)
            }
        };
        context.DrawRectangle(brush, null, new Rect(Bounds.Size));
    }
}
The trade-off is platform integration fidelity. Because Avalonia draws everything itself, controls don't automatically inherit system accessibility trees, native IME behavior, or OS-level text rendering preferences the way WPF and WinUI 3 do. These gaps have narrowed significantly in Avalonia 11, with improved accessibility support, but achieving a native feel on each platform still requires more deliberate effort than with frameworks built on OS primitives.
What .NET engineers should know:
- 👼 Junior: Avalonia draws all controls itself using Skia. This makes it truly cross-platform, but it means controls don't look like native OS widgets by default.
- 🎓 Middle: Understand the rendering backend options Skia for cross-platform consistency, Direct2D or Metal for platform-native GPU integration — and choose based on whether pixel-perfect cross-platform consistency or native GPU features matter more.
- 👑 Senior: Evaluate Avalonia vs WinUI 3 on accessibility requirements and native shell integration needs — Avalonia's self-rendered pipeline is powerful for consistent cross-platform desktop UIs, but requires explicit investment in accessibility and IME support that WinUI 3 inherits from Windows automatically.
❓ What is the Avalonia MVVM toolkit, and how does it integrate with ReactiveUI or CommunityToolkit.Mvvm?
Avalonia has no mandatory MVVM framework — it's MVVM-friendly by design but ships without one baked in. The two dominant choices are ReactiveUI and CommunityToolkit.Mvvm. ReactiveUI is Avalonia's historically preferred option and ships as part of the official Avalonia.ReactiveUI package — it integrates deeply with Avalonia's routing, view activation lifecycle, and IViewFor<T> pattern. CommunityToolkit.Mvvm is a lighter, source-generator-based alternative that requires no Avalonia-specific integration and works through standard INotifyPropertyChanged.
ReactiveUI brings reactive programming into the ViewModel layer via IObservable<T> streams — property changes, command execution, and validation all compose as observable pipelines. This is powerful for complex async UI flows but carries a learning curve. CommunityToolkit.Mvvm is simpler: attributes like [ObservableProperty] and [RelayCommand] generate the boilerplate at compile time with no runtime overhead.
Example of a ViewModel using ReactiveUI with Avalonia:
public class SearchViewModel : ReactiveObject
{
    private string _query = string.Empty;

    public string Query
    {
        get => _query;
        set => this.RaiseAndSetIfChanged(ref _query, value);
    }

    public ReactiveCommand<Unit, IEnumerable<Result>> Search { get; }

    public SearchViewModel()
    {
        var canSearch = this.WhenAnyValue(x => x.Query)
            .Select(q => !string.IsNullOrWhiteSpace(q));

        Search = ReactiveCommand.CreateFromTask(
            execute: _ => SearchService.RunAsync(Query),
            canExecute: canSearch);
    }
}
Example of the same ViewModel using CommunityToolkit.Mvvm:
public partial class SearchViewModel : ObservableObject
{
    [ObservableProperty]
    [NotifyCanExecuteChangedFor(nameof(SearchCommand))]
    private string _query = string.Empty;

    [RelayCommand(CanExecute = nameof(CanSearch))]
    private async Task SearchAsync() =>
        Results = await SearchService.RunAsync(Query);

    private bool CanSearch() => !string.IsNullOrWhiteSpace(Query);
}
The choice maps to team preference and complexity. ReactiveUI shines when ViewModel logic involves composing multiple async streams — throttling search input, combining results, and handling cancellation reactively. CommunityToolkit.Mvvm wins on simplicity and familiarity for teams coming from WPF or MAUI, where it's already standard.
What .NET engineers should know:
- 👼 Junior: Both work with Avalonia — ReactiveUI via
Avalonia.ReactiveUIpackage, CommunityToolkit.Mvvm as a plain NuGet reference with no Avalonia-specific wiring needed. - 🎓 Middle: ReactiveUI's
IViewFor<T>andWhenActivatedintegrate with Avalonia's view lifecycle for subscription management — useWhenActivatedto scope reactive subscriptions to control lifetime and avoid memory leaks. - 👑 Senior: Choose ReactiveUI when the domain naturally models as event streams and async pipelines; choose CommunityToolkit.Mvvm when the team prioritizes simplicity, testability, and consistency with other .NET projects in the solution.
📚 Resources: Introduction to the MVVM Toolkit
❓ How does Avalonia handle theming and styling compared to WPF resource dictionaries?
Avalonia's styling system is CSS-inspired rather than WPF's resource dictionary lookup model. In WPF, styles are keyed resources resolved through a static tree walk — StaticResource vs DynamicResource being a constant source of ordering bugs. Avalonia uses selector-based styles that match controls by type, class, pseudoclass, or property state, much like CSS selectors targeting HTML elements. Styles cascade and compose rather than being keyed lookups, which makes theming more predictable and easier to reason about.
Avalonia ships two first-party themes — SimpleTheme and FluentTheme — applied at the app level. Custom theming layers on top through style overrides or by building a full theme library. Style classes work like CSS classes: assign them to controls and write selector rules targeting those classes, keeping styling decoupled from control logic.
Example of selector-based styling in Avalonia:
<Application.Styles>
    <FluentTheme />
    <Style Selector="Button.primary">
        <Setter Property="Background" Value="#0078D4"/>
        <Setter Property="Foreground" Value="White"/>
        <Setter Property="CornerRadius" Value="4"/>
    </Style>
    <Style Selector="Button.primary:pointerover">
        <Setter Property="Background" Value="#006CBE"/>
    </Style>
</Application.Styles>

<!-- Usage -->
<Button Classes="primary" Content="Save" />
Example of dynamic theming via ResourceDictionary switching:
// Toggle between light and dark theme at runtime
Application.Current!.RequestedThemeVariant = ThemeVariant.Dark;
WPF resource dictionaries still exist in Avalonia for resource sharing — colors, brushes, and converters live there — but they're not the primary styling mechanism. The selector system handles what WPF would express through Style TargetType and ControlTemplate triggers, with less XML ceremony and clearer cascade rules.
What .NET engineers should know:
- 👼 Junior: Avalonia styles use CSS-like selectors targeting control types and classes — assign
Classesto a control and write aSelectorrule to style it. - 🎓 Middle: Understand selector specificity and cascade order — styles defined later override earlier ones, and pseudoclasses like
:pointeroverand:pressedreplace WPF triggers for interactive states. - 👑 Senior: Build theme libraries as separate NuGet packages with
ResourceDictionaryfor shared tokens and selector-based styles for control overrides — this keeps themes portable across projects and testable in isolation with Avalonia's headless testing infrastructure.
📚 Resources:
❓ How do you test Avalonia UI components in headless mode?
Avalonia ships a headless testing platform via Avalonia.Headless that runs the full UI stack — layout, rendering, input, and visual tree — without a real window or display. This means that control behavior, bindings, style application, and user interaction can be tested in a standard xUnit or NUnit test suite, with no UI automation framework required. The headless backend renders to an in-memory bitmap, enabling pixel-level assertions alongside logical control-state checks.
Setup requires configuring the Avalonia app with the headless backend in a test fixture. From there, tests create windows, interact with controls programmatically, and assert against the visual tree or ViewModel state.
Example of configuring headless Avalonia in xUnit:
[assembly: AvaloniaTestApplication(typeof(TestAppBuilder))]

public class TestAppBuilder
{
    public static AppBuilder BuildAvaloniaApp() =>
        AppBuilder.Configure<App>()
            .UseHeadless(new AvaloniaHeadlessOptions
            {
                UseHeadlessDrawing = true
            });
}
Example of testing a control interaction in headless mode:
public class LoginViewTests
{
    [AvaloniaFact]
    public void SubmitButton_DisabledWhenFieldsEmpty()
    {
        var view = new LoginView { DataContext = new LoginViewModel() };
        var window = new Window { Content = view };
        window.Show();

        var button = view.FindControl<Button>("SubmitButton");
        Assert.False(button!.IsEnabled);
    }

    [AvaloniaFact]
    public void SubmitButton_EnabledWhenCredentialsEntered()
    {
        var vm = new LoginViewModel { Username = "user", Password = "pass" };
        var view = new LoginView { DataContext = vm };
        var window = new Window { Content = view };
        window.Show();

        var button = view.FindControl<Button>("SubmitButton");
        Assert.True(button!.IsEnabled);
    }
}
Example of simulating keyboard and pointer input:
[AvaloniaFact]
public void SearchBox_UpdatesViewModel_OnTextInput()
{
    var vm = new SearchViewModel();
    var view = new SearchView { DataContext = vm };
    var window = new Window { Content = view };
    window.Show();

    var input = view.FindControl<TextBox>("SearchBox")!;
    input.Focus();
    window.KeyTextInput("hello");

    Assert.Equal("hello", vm.Query);
}
Headless tests run on CI without a display server — no Xvfb on Linux or UI thread marshaling needed. [AvaloniaFact] and [AvaloniaTheory] replace xUnit's standard attributes and handle the Avalonia dispatcher context automatically.
What .NET engineers should know:
- 👼 Junior: Use
[AvaloniaFact]instead of[Fact]for Avalonia headless tests — it sets up the dispatcher context so UI thread operations work correctly in tests. - 🎓 Middle: Prefer testing through the ViewModel where possible and reserve headless UI tests for verifying bindings, visual state changes, and control interactions that can't be covered at the ViewModel layer alone.
- 👑 Senior: Integrate headless tests into CI without display dependencies, use screenshot comparison via
CaptureRenderedFramefor visual regression testing, and isolate headless tests from unit tests in separate projects to keep feedback loops fast.
📚 Resources: 🎥 Building Rock-Solid Avalonia Apps A Guide to Headless Testing with AI Assistance
MVVM and Architecture
❓ What problems does MVVM solve, and when does it become over-engineering?
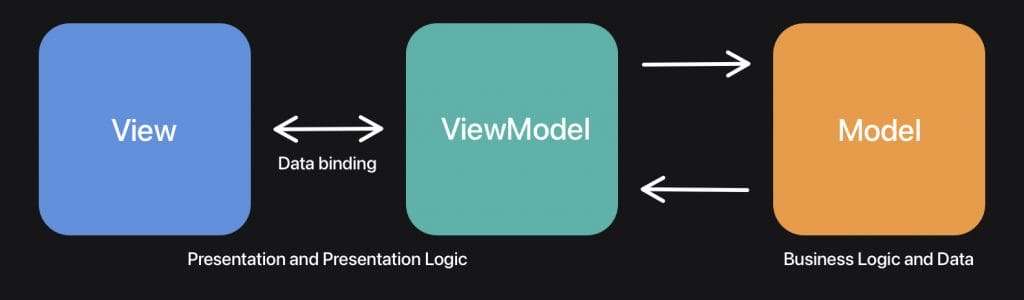
MVVM solves three concrete problems: testability, separation of UI logic from business logic, and designer-developer collaboration. By binding the View to a ViewModel that knows nothing about UI controls, you can unit test all presentation logic — state transitions, command enabling, validation — without spinning up a window. The View becomes a thin declarative skin over the observable state, making it replaceable without touching logic.
The pattern earns its complexity in apps with meaningful presentation logic: multi-step workflows, real-time data updates, complex validation, navigation state, and role-based UI toggling. These scenarios genuinely benefit from an observable ViewModel decoupled from the view hierarchy.
Over-engineering starts when the app doesn't have that complexity. A settings page with five fields and a save button does not need a ViewModel with a RelayCommand, IDialogService, INavigationService, and a messenger subscription — a 30-line code-behind is faster to write, easier to read, and has no meaningful downside. The MVVM ceremony becomes a liability when the logic it organizes is trivial.
The warning signs that MVVM has become overhead:
// Over-engineered — ViewModel exists purely to proxy a single value with no logic
public partial class SplashViewModel : ObservableObject
{
    [ObservableProperty]
    private string _appVersion = Assembly.GetExecutingAssembly()
        .GetName().Version?.ToString() ?? "1.0";
}

// Just put this in code-behind — it's not testable logic, it's display wiring
public partial class SplashPage : Page
{
    public SplashPage()
    {
        InitializeComponent();
        VersionText.Text = Assembly.GetExecutingAssembly()
            .GetName().Version?.ToString() ?? "1.0";
    }
}
The pragmatic position: use MVVM for screens with real logic, commands, or state that benefits from testing. Use code-behind for simple screens, one-off dialogs, and pure UI behavior, such as animation triggers or focus management, that has no business logic to test.
What .NET engineers should know:
- 👼 Junior: MVVM separates UI from logic so ViewModels can be unit tested without a window — apply it to screens with real logic, not every page by default.
- 🎓 Middle: Recognize when a ViewModel is just proxying properties with no added logic — collapsing those into code-behind reduces indirection without sacrificing testability since there's nothing meaningful to test.
- 👑 Senior: Establish team conventions that define when MVVM is required vs. optional — enforce it for shared ViewModels, navigation, and business logic screens, allow code-behind for pure UI concerns, and resist the pressure to apply the pattern uniformly just for architectural consistency when the cost outweighs the benefit.
❓ How do you integrate Win32/native APIs into modern .NET desktop apps?
Win32 integration in .NET means calling into native Windows DLLs — user32.dll, kernel32.dll, dwmapi.dll and others — through P/Invoke or the newer LibraryImport source generator. This is necessary when the managed API surface doesn't expose what you need: custom window chrome, low-level input hooks, hardware access, or OS shell integration not covered by WinRT or the Windows App SDK.
The traditional approach is DllImport with manual marshaling. The modern approach is LibraryImport a source generator introduced in .NET 7 that generates the P/Invoke marshaling code at compile time, making it AOT-compatible and eliminating runtime reflection. For apps targeting .NET 7+, LibraryImport is the preferred path.
Example of traditional P/Invoke vs modern LibraryImport:
// Traditional — runtime marshaling, not AOT-safe
[DllImport("user32.dll", SetLastError = true)]
private static extern bool SetWindowPos(
    IntPtr hWnd, IntPtr hWndInsertAfter,
    int x, int y, int cx, int cy, uint uFlags);

// Modern — source-generated, AOT-compatible
public partial class NativeWindow
{
    [LibraryImport("user32.dll", SetLastError = true)]
    [return: MarshalAs(UnmanagedType.Bool)]
    private static partial bool SetWindowPos(
        IntPtr hWnd, IntPtr hWndInsertAfter,
        int x, int y, int cx, int cy, uint uFlags);
}
Example of using Windows Community Toolkit P/Invoke helpers and custom window chrome via DWM:
// Extend glass frame into client area — custom titlebar in WinUI 3
public static void ExtendAcrylicIntoTitleBar(Window window)
{
    var hwnd = WinRT.Interop.WindowNative.GetWindowHandle(window);
    var margins = new MARGINS { cxLeftWidth = -1 }; // extend all sides

    DwmExtendFrameIntoClientArea(hwnd, ref margins);
}

[LibraryImport("dwmapi.dll")]
private static partial int DwmExtendFrameIntoClientArea(
    IntPtr hwnd, ref MARGINS margins);

[StructLayout(LayoutKind.Sequential)]
private struct MARGINS
{
    public int cxLeftWidth, cxRightWidth, cyTopHeight, cyBottomHeight;
}
Example of a global keyboard hook via SetWindowsHookEx:
public class GlobalKeyboardHook : IDisposable
{
    private IntPtr _hookHandle;
    private readonly LowLevelKeyboardProc _callback;

    public GlobalKeyboardHook()
    {
        _callback = HookCallback; // prevent GC collection
        _hookHandle = SetWindowsHookEx(WH_KEYBOARD_LL, _callback,
            GetModuleHandle(null), 0);
    }

    private IntPtr HookCallback(int nCode, IntPtr wParam, IntPtr lParam)
    {
        if (nCode >= 0)
            KeyPressed?.Invoke(Marshal.ReadInt32(lParam));
        return CallNextHookEx(_hookHandle, nCode, wParam, lParam);
    }

    public void Dispose() => UnhookWindowsHookEx(_hookHandle);

    public event Action<int>? KeyPressed;

    private delegate IntPtr LowLevelKeyboardProc(int nCode, IntPtr wParam, IntPtr lParam);
    private const int WH_KEYBOARD_LL = 13;

    [LibraryImport("user32.dll")] private static partial IntPtr SetWindowsHookEx(
        int idHook, LowLevelKeyboardProc lpfn, IntPtr hMod, uint dwThreadId);
    [LibraryImport("user32.dll")] private static partial bool UnhookWindowsHookEx(IntPtr hhk);
    [LibraryImport("user32.dll")] private static partial IntPtr CallNextHookEx(
        IntPtr hhk, int nCode, IntPtr wParam, IntPtr lParam);
    [LibraryImport("kernel32.dll")] private static partial IntPtr GetModuleHandle(
        [MarshalAs(UnmanagedType.LPWStr)] string? lpModuleName);
}
The CsWin32 source generator is worth adopting for any serious Win32 integration — it generates correct P/Invoke signatures, structs, and constants from the Windows metadata on demand, eliminating hand-written declarations that are a common source of marshaling bugs.
What .NET engineers should know:
- 👼 Junior: Use
[LibraryImport]instead of[DllImport]for new P/Invoke declarations — it's AOT-compatible and generates marshaling code at compile time rather than using runtime reflection. - 🎓 Middle: Use the
CsWin32NuGet source generator to generate Win32 API signatures on demand rather than writing them by hand — it pulls from Windows SDK metadata and eliminates an entire class of marshaling declaration bugs. - 👑 Senior: Keep Win32 interop isolated behind thin wrapper classes with managed-friendly interfaces — raw
IntPtrhandles and unmanaged structs should never leak into the ViewModel or business logic layers, and always implementIDisposableon any class holding unmanaged handles to guarantee cleanup.
📚 Resources:
❓ How does the CommunityToolkit.Mvvm library simplify MVVM implementation in modern desktop apps?
CommunityToolkit.Mvvm (often called the MVVM Toolkit) is a source-generator-based MVVM library from Microsoft that eliminates boilerplate without runtime overhead. Instead of manually implementing INotifyPropertyChanged, writing SetProperty calls, and wiring ICommand implementations by hand, attributes like [ObservableProperty] and [RelayCommand] generate all that code at compile time. The result is ViewModels that express only business intent — the plumbing is invisible.
The library is framework-agnostic; it works identically in WPF, WinUI 3, MAUI, and Avalonia, making it the natural choice when sharing ViewModels across multiple UI targets in the same solution.
Example of a ViewModel before and after CommunityToolkit.Mvvm:
// Without toolkit — manual boilerplate
public class CounterViewModel : INotifyPropertyChanged
{
    private int _count;
    public int Count
    {
        get => _count;
        set { _count = value; PropertyChanged?.Invoke(this, new(nameof(Count))); }
    }
    public event PropertyChangedEventHandler? PropertyChanged;
}

// With toolkit — generated at compile time
public partial class CounterViewModel : ObservableObject
{
    [ObservableProperty]
    private int _count;
}
Example of commands, validation, and messaging:
public partial class ProductViewModel : ObservableValidator
{
[ObservableProperty]
[NotifyDataErrorInfo]
[Required]
[MinLength(3)]
private string _name = string.Empty;
[RelayCommand(CanExecute = nameof(CanSave))]
private async Task SaveAsync() =>
await _repository.SaveAsync(Name);
!HasErrors &amp;amp;amp;amp;amp;amp;amp;amp;amp;amp;amp;amp;amp;amp;amp;amp;&amp;amp;amp;amp;amp;amp;amp;amp;amp;amp;amp;amp;amp;amp;amp;amp; !string.IsNullOrWhiteSpace(Name)
}Beyond properties and commands, the toolkit ships WeakReferenceMessenger for decoupled cross-ViewModel communication and ObservableValidator for integrating DataAnnotations validation directly into the ViewModel layer.
What .NET engineers should know:
- 👼 Junior: Use
[ObservableProperty]and[RelayCommand]on apartialclass inheritingObservableObjectthe toolkit generates allINotifyPropertyChangedandICommandboilerplate automatically. - 🎓 Middle: Use
ObservableValidatorwith[NotifyDataErrorInfo]for form validation andWeakReferenceMessengerfor decoupled ViewModel-to-ViewModel communication without tight coupling. - 👑 Senior: The toolkit's framework-agnostic design makes it the right choice for solutions sharing ViewModels across WPF, MAUI, or Blazor — establish it as the standard across all UI projects to keep ViewModel logic portable and independently testable.
📚 Resources:
❓ What is the difference between RelayCommand and AsyncRelayCommand in CommunityToolkit.Mvvm?
RelayCommand wraps synchronous Action delegates, it's for commands that complete immediately without awaiting anything. AsyncRelayCommand wraps Func<Task> and handles the async execution lifecycle: it tracks whether the command is running via IsRunning, automatically disables itself during execution to prevent double-invocation, and propagates exceptions through the standard task pipeline. Both implement ICommand and work identically from the binding side.
The practical difference shows up in UI behavior. A RelayCommand executing a slow synchronous operation blocks the UI thread. An AsyncRelayCommand executing the same work as a Task keeps the UI responsive and gives you IsRunning to bind a loading indicator without any extra ViewModel state.
Example of both commands side by side:
public partial class OrderViewModel : ObservableObject
{
    // Synchronous — for instant operations
    [RelayCommand]
    private void ClearSelection() => SelectedOrder = null;

    // Async — for I/O, HTTP, database operations
    [RelayCommand]
    private async Task LoadOrdersAsync(CancellationToken token)
    {
        Orders = await _repository.GetOrdersAsync(token);
    }
}
Example of binding a loading indicator to AsyncRelayCommand:
<Button Content="Load Orders"
        Command="{Binding LoadOrdersCommand}" />

<ActivityIndicator IsRunning="{Binding LoadOrdersCommand.IsRunning}"
                   IsVisible="{Binding LoadOrdersCommand.IsRunning}" />
AsyncRelayCommand also accepts a CancellationToken parameter automatically when the method signature includes one — the toolkit wires cancellation support without any extra plumbing. Concurrent execution behavior is configurable via AsyncRelayCommandOptions.AllowConcurrentExecutions for cases where re-entrancy is intentional.
What .NET engineers should know:
- 👼 Junior: Use
[RelayCommand]for synchronous operations and[RelayCommand]on anasync Taskmethod for async ones — the toolkit generatesAsyncRelayCommandautomatically when it detects the async signature. - 🎓 Middle: Bind loading spinners to
Command.IsRunninginstead of managing a separateIsBusyproperty —AsyncRelayCommandtracks execution state for free, and addCancellationTokento the method signature to get cancellation support with no extra wiring. - 👑 Senior: Configure concurrent execution policy deliberately — the default disables the command while running, which is safe but may need overriding for scenarios like real-time search where overlapping executions are expected and managed via cancellation.
📚 Resources:
❓ How do you implement navigation as a service in MVVM desktop applications?
Navigation as a service means ViewModels trigger navigation without knowing anything about the UI layer — no references to Frame, NavigationService, or Shell.Current inside the ViewModel code. Instead, an INavigationService abstraction is defined in the shared layer, implemented by the UI layer, and injected into ViewModels via DI. This keeps ViewModels fully testable and decoupled from the host framework.
The service exposes typed navigation methods. The implementation varies per framework — WinUI 3 wraps Frame.Navigate(), MAUI wraps Shell.Current.GoToAsync() Avalonia manages a content host, but the ViewModel always calls the same interface regardless.
Example of the navigation service abstraction and registration:
// Shared abstraction
public interface INavigationService
{
    void NavigateTo<TViewModel>() where TViewModel : ObservableObject;
    void GoBack();
}

// MauiProgram.cs / App.xaml.cs
builder.Services.AddSingleton<INavigationService, MauiNavigationService>();
builder.Services.AddTransient<ProductListViewModel>();
builder.Services.AddTransient<ProductDetailViewModel>();
Example of a MAUI implementation and a ViewModel consuming it:
// MAUI implementation
public class MauiNavigationService : INavigationService
{
    private static readonly Dictionary<Type, string> _routes = new()
    {
        { typeof(ProductDetailViewModel), "product/detail" }
    };

    public async void NavigateTo<TViewModel>() where TViewModel : ObservableObject
    {
        if (_routes.TryGetValue(typeof(TViewModel), out var route))
            await Shell.Current.GoToAsync(route);
    }

    public async void GoBack() => await Shell.Current.GoToAsync("..");
}

// ViewModel — no UI framework reference
public partial class ProductListViewModel : ObservableObject
{
    private readonly INavigationService _navigation;

    public ProductListViewModel(INavigationService navigation)
        => _navigation = navigation;

    [RelayCommand]
    private void OpenDetail() => _navigation.NavigateTo<ProductDetailViewModel>();
}
Passing parameters across navigation requires extending the interface — either a generic NavigateTo<TViewModel, TParam>(TParam param) overload or a separate INavigationParameterService. Avoid storing navigation parameters in the static state; pass them explicitly through the service contract to keep the flow traceable and testable.
What .NET engineers should know:
- 👼 Junior: Define
INavigationServicein the shared layer and inject it into ViewModels — never referenceShell.Current,Frame, or any UI type directly inside a ViewModel. - 🎓 Middle: Extend the interface to handle parameter passing typed to the destination ViewModel, and ensure the implementation resolves destination pages and ViewModels through the DI container to avoid bypassing the composition root.
- 👑 Senior: Design the navigation contract to support the full navigation graph — back stack manipulation, modal flows, and deep linking — before implementation, as retrofitting these onto a minimal interface mid-project is significantly more disruptive than designing for them upfront.
📚 Resources:
❓ How do you handle dialog and overlay coordination in MVVM without code-behind?
Dialogs are a classic MVVM pain point — showing a dialog is inherently a UI concern, but the decision to show it is a ViewModel concern. The clean solution is an IDialogService abstraction injected into ViewModels, identical in principle to navigation as a service. The ViewModel calls _dialogService.ShowAsync<TDialog>() and receives a typed result; the implementation handles the actual UI instantiation and display.
The service pattern keeps ViewModels fully testable — mock IDialogService returns a predetermined result without any UI involved. Avoid the common shortcut of using WeakReferenceMessenger to fire a "show dialog" message from a ViewModel and handle it in code-behind — it works but scatters dialog coordination logic across the codebase invisibly.
Example of dialog service abstraction and ViewModel usage:
public interface IDialogService
{
    Task<bool> ShowConfirmAsync(string title, string message);
    Task ShowAlertAsync(string title, string message);
    Task<TResult?> ShowDialogAsync<TDialog, TResult>()
        where TDialog : class;
}

public partial class OrderViewModel : ObservableObject
{
    private readonly IDialogService _dialogs;

    public OrderViewModel(IDialogService dialogs) => _dialogs = dialogs;

    [RelayCommand]
    private async Task DeleteOrderAsync()
    {
        var confirmed = await _dialogs.ShowConfirmAsync(
            "Delete Order", "This cannot be undone. Continue?");

        if (confirmed)
            await _repository.DeleteAsync(SelectedOrder!.Id);
    }
}
Example of a MAUI implementation and WinUI 3 implementation:
// MAUI
public class MauiDialogService : IDialogService
{
    public async Task<bool> ShowConfirmAsync(string title, string message)
    {
        var page = Application.Current!.MainPage!;
        return await page.DisplayAlert(title, message, "Yes", "No");
    }

    public Task ShowAlertAsync(string title, string message) =>
        Application.Current!.MainPage!.DisplayAlert(title, message, "OK");
}

// WinUI 3
public class WinUIDialogService : IDialogService
{
    private readonly Window _window;
    public WinUIDialogService(Window window) => _window = window;

    public async Task<bool> ShowConfirmAsync(string title, string message)
    {
        var dialog = new ContentDialog
        {
            Title = title, Content = message,
            PrimaryButtonText = "Yes", CloseButtonText = "No",
            XamlRoot = _window.Content.XamlRoot
        };
        var result = await dialog.ShowAsync();
        return result == ContentDialogResult.Primary;
    }
}
For custom overlay UIs — side panels, toast notifications, in-app popups — an IOverlayService follows the same pattern but manages a dedicated overlay host region in the shell rather than modal dialogs. The ViewModel requests the overlay; the shell decides where and how to render it.
What .NET engineers should know:
- 👼 Junior: Define
IDialogServiceand inject it into ViewModels — never callDisplayAlertorContentDialogdirectly from ViewModel code. - 🎓 Middle: Return typed results from dialog methods so ViewModels can branch on user decisions without coupling to UI types, and register the implementation as a singleton tied to the app's root window or page.
- 👑 Senior: Design the dialog service to support custom ViewModel-backed dialogs —
ShowDialogAsync<TDialog, TResult>resolves the dialog's ViewModel from DI, keeping complex dialogs as fully testable ViewModel units rather than code-behind logic.
📚 Resources:
❓ What are source generators in CommunityToolkit.Mvvm and what boilerplate do they eliminate?
Source generators are a C# compiler feature that runs during compilation and produces additional C# code based on what it finds in your source. CommunityToolkit.Mvvm uses them to inspect attributes like [ObservableProperty] and [RelayCommand] on partial classes and generate all the INotifyPropertyChanged plumbing, backing fields, and ICommand implementations automatically — the generated code is real C# that you can inspect in obj/ folders, it just never lives in your source tree.
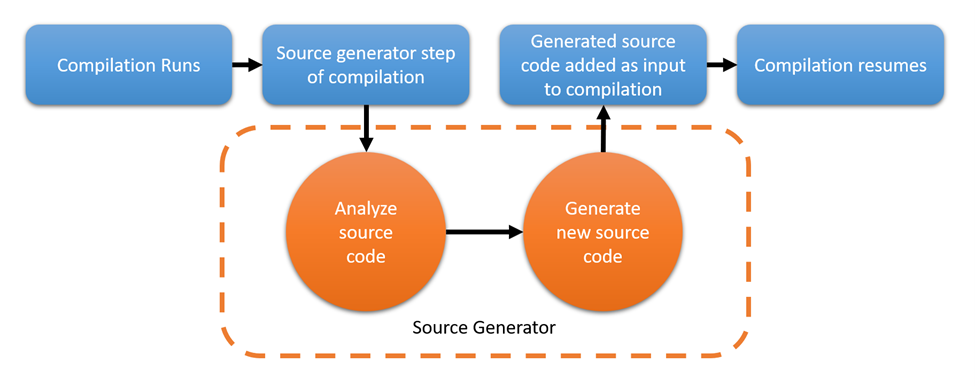
The boilerplate they eliminate is substantial. A single [ObservableProperty] on a private field generates the public property, the PropertyChanged notification, OnPropertyChanging/OnPropertyChanged partial method hooks, and any dependent [NotifyCanExecuteChangedFor] or [NotifyPropertyChangedFor] invalidations. Without the generator, every observable property is 8-12 lines of repetitive code that obscures what the ViewModel actually does.
What .NET engineers should know:
- 👼 Junior: Decorate private fields with
[ObservableProperty]and async methods with[RelayCommand]on apartial classinheritingObservableObject— the generator writes all the boilerplate so you don't have to. - 🎓 Middle: Use
OnPropertyChangedpartial method hooks for side effects,[NotifyPropertyChangedFor]for dependent computed properties, and[NotifyCanExecuteChangedFor]to invalidate commands — all without manually wiringPropertyChangedsubscriptions. - 👑 Senior: Source generators run at compile time with zero runtime overhead — unlike reflection-based MVVM frameworks, there's no startup cost, and generated code is fully debuggable and AOT-compatible, making the toolkit the right choice for MAUI and NativeAOT scenarios.
📚 Resources: MVVM source generators
❓ How do you manage application state across views in a desktop MVVM application?
Application state management is about deciding where data lives, who owns it, and how changes propagate to interested ViewModels. The core problem: when two views need the same data — a user profile shown in a sidebar and an editor page — who holds the truth, and how does a change in one reflect in the other.
The three main approaches are shared singleton services, messaging, and observable state containers. They're not mutually exclusive — most real apps use all three for different categories of state.
Example of a shared state service injected across ViewModels:
// Singleton service owns the state
public class UserSessionService : ObservableObject
{
    [ObservableProperty]
    private UserProfile? _currentUser;

    [ObservableProperty]
    private IReadOnlyList<Notification> _notifications = [];
}

// Both ViewModels receive the same instance via DI
public partial class HeaderViewModel : ObservableObject
{
    private readonly UserSessionService _session;
    public HeaderViewModel(UserSessionService session) => _session = session;
    public UserProfile? CurrentUser => _session.CurrentUser;
}
Example of cross-ViewModel messaging for decoupled state changes:
// Message definition
public record OrderPlacedMessage(int OrderId, decimal Total);

// Sender ViewModel
public partial class CheckoutViewModel : ObservableObject
{
    [RelayCommand]
    private async Task PlaceOrderAsync()
    {
        var order = await _repository.CreateOrderAsync(Cart);
        WeakReferenceMessenger.Default.Send(new OrderPlacedMessage(order.Id, order.Total));
    }
}

// Receiver ViewModel
public partial class OrderHistoryViewModel : ObservableObject,
    IRecipient<OrderPlacedMessage>
{
    public OrderHistoryViewModel() =>
        WeakReferenceMessenger.Default.RegisterAll(this);

    public void Receive(OrderPlacedMessage message) =>
        Orders.Insert(0, new OrderSummary(message.OrderId, message.Total));
}
Example of an observable state container for complex shared state:
public class AppStateStore : ObservableObject
{
    public static AppStateStore Instance { get; } = new();

    [ObservableProperty] private Theme _activeTheme = Theme.Light;
    [ObservableProperty] private bool _isSidebarOpen = true;
    [ObservableProperty] private NavigationContext _currentContext = new();
}
The right model per state category: session/auth state → singleton service; cross-ViewModel events → messaging; UI shell state (theme, layout) → observable store; local transient state (form input, selection) → stays in the ViewModel that owns that view.
What .NET engineers should know:
- 👼 Junior: Register shared state as a singleton service in DI and inject it into any ViewModel that needs it — the same instance means changes are automatically reflected everywhere.
- 🎓 Middle: Use
WeakReferenceMessengerfor events where the sender shouldn't know its receivers — order placed, user logged out, settings changed — but avoid it for states that need to be queried, not just reacted to. - 👑 Senior: Define state ownership explicitly upfront — classify state as session, domain, UI shell, or local before choosing a mechanism, and avoid letting ViewModels accumulate shared state responsibilities that belong in a dedicated service layer.
📚 Resources: Messenger
Performance and Rendering
❓ How do you manage multi-window applications in WinUI 3 or WPF, and how do you handle DPI awareness across monitors?
Multi-window management in WinUI 3 means each window is an independent Microsoft.UI.Xaml.Window instance with its own DispatcherQueue and compositor. Unlike WPF where windows share a single Application.Current.Windows collection, WinUI 3 has no built-in window registry — you track windows yourself. Each window needs its own AppWindow handle for positioning, sizing, and title bar customization via the Windows App SDK windowing APIs.
DPI awareness determines how the OS scales your window on high-DPI monitors. Modern .NET desktop apps should declare PerMonitorV2 awareness — the window receives WM_DPICHANGED when moved between monitors of different DPI and is responsible for re-scaling its content. WinUI 3 handles this automatically for XAML content. WPF requires explicit per-monitor DPI handling via HwndSource or the PerMonitorV2 manifest setting.
Example of multi-window management service in WinUI 3:
public class WindowManager
{
    private readonly List<Window> _windows = [];

    public Window CreateWindow<TPage>() where TPage : Page, new()
    {
        var window = new Window();
        var frame = new Frame();
        frame.Navigate(typeof(TPage));
        window.Content = frame;

        window.Closed += (s, e) => _windows.Remove(window);
        _windows.Add(window);
        window.Activate();
        return window;
    }

    public void CloseAll() => _windows.ToList().ForEach(w => w.Close());
}
Example of positioning a window on a specific monitor using AppWindow:
public static void MoveToMonitor(Window window, int monitorIndex)
{
    var appWindow = window.AppWindow;
    var displays = DisplayArea.FindAll();

    if (monitorIndex >= displays.Count) return;

    var display = displays[monitorIndex];
    var workArea = display.WorkArea;

    appWindow.MoveAndResize(new RectInt32(
        workArea.X + 100, workArea.Y + 100, 1200, 800));
}
Example of per-monitor DPI handling in WPF:
<!-- app.manifest — enable PerMonitorV2 DPI awareness -->
<application xmlns="urn:schemas-microsoft-com:asm.v3">
  <windowsSettings>
    <dpiAwareness xmlns="http://schemas.microsoft.com/SMI/2016/WindowsSettings">
      PerMonitorV2
    </dpiAwareness>
  </windowsSettings>
</application>
// WPF — respond to DPI changes when window moves between monitors
protected override void OnDpiChanged(DpiScale oldDpi, DpiScale newDpi)
{
base.OnDpiChanged(oldDpi, newDpi);
// Scale any manually positioned or sized elements
var scale = newDpi.DpiScaleX;
Canvas.SetLeft(FloatingPanel, Canvas.GetLeft(FloatingPanel) * scale);
}A common WinUI 3 pitfall is ContentDialog — it requires XamlRoot set to the window's content root, and each window has its own XamlRoot. Dialogs shown without the correct XamlRoot throw at runtime. When managing multiple windows, always resolve the XamlRoot from the window hosting the dialog, not from a global reference.
// Correct — resolve XamlRoot per window
public async Task ShowDialogAsync(Window owner)
{
    var dialog = new ContentDialog
    {
        Title = "Confirm",
        Content = "Are you sure?",
        PrimaryButtonText = "Yes",
        CloseButtonText = "No",
        XamlRoot = owner.Content.XamlRoot // critical
    };
    await dialog.ShowAsync();
}
What .NET engineers should know:
- 👼 Junior: WinUI 3 has no built-in window registry — maintain your own list of open windows and subscribe to
Window.Closedto remove them, and always setXamlRootonContentDialogto the window that owns it. - 🎓 Middle: Declare
PerMonitorV2DPI awareness in the app manifest and handleOnDpiChangedin WPF for any manually positioned or sized elements — XAML layout scales automatically but Win32 interop, custom rendering, and hardcoded pixel values do not. - 👑 Senior: Design the window management service to handle the full lifecycle — creation, activation, focus routing, inter-window messaging via
WeakReferenceMessenger, and graceful shutdown, ensuring all windows close cleanly before the process exits. Test multi-monitor scenarios explicitly with mixed-DPI displays in CI using display emulation, since DPI bugs are invisible on single-monitor developer machines.
📚 Resources:
- Manage app windows
- Retrieve a window handle (HWND)
- High DPI Desktop Application Development on Windows
- WPF Graphics Rendering Overview
❓ How do you diagnose and fix UI performance issues in WPF/WinUI?
UI performance issues in WPF and WinUI 3 fall into three categories: layout thrashing, render bottlenecks, and UI thread overload. Diagnosing which category applies before optimizing is essential — applying the wrong fix wastes time and can introduce new issues. The right starting point is always a profiler, not intuition.
For WPF, the primary diagnostic tools are Visual Studio's XAML Hot Reload diagnostics, the WPF Performance Suite (Perforator and Visual Profiler from the Windows SDK), and PerfView for CPU and GC analysis. For WinUI 3, Visual Studio's GPU Usage tool and the Windows Performance Analyzer (WPA) with XAML provider traces expose compositor thread load, layout pass timing, and render frame drops.
For WinUI 3 specifically, overusing VisualStateManager triggers with complex storyboards on many simultaneously visible items compounds compositor load. Prefer composition animations via ElementCompositionPreview for item-level animations in lists, reserving VisualStateManager for page-level state transitions.
What .NET engineers should know:
- 👼 Junior: Use the Visual Studio Diagnostic Tools to identify whether slowness is on the UI thread or GPU — look for long UI thread frames and excessive layout passes before changing any code.
- 🎓 Middle: Fix the three most common culprits first — bulk
ObservableCollectionupdates firing per-itemCollectionChanged, large images decoded at full resolution and scaled in XAML, and complexDataTemplatehierarchies triggering deep layout passes on every scroll tick. Each has a straightforward fix that yields measurable improvement. - 👑 Senior: Establish a performance profiling gate in CI using ETW traces or WPA snapshots to catch regressions before they ship — define frame budget targets per screen type, automate layout pass count measurement for list-heavy surfaces, and treat
Freeze()on all sharedFreezableobjects (brushes, geometries, bitmaps) as a code review requirement rather than an optional optimization.
📚 Resources:
❓ How do you virtualize large lists and data grids in modern desktop frameworks?
Virtualization means only creating and rendering the UI elements currently visible in the viewport — not one control per data item. Without it, a list of 100,000 items creates 100,000 controls in memory, making the UI slow to load and expensive to scroll. All modern desktop frameworks support some form of virtualization, but they differ in how automatic it is and what breaks it.
The common culprit that silently disables virtualization is wrapping a list in a ScrollViewer or placing it inside a StackPanel. Both force the list to measure all items at once, collapsing the virtualization window to the full dataset. The fix is always the same: let the list control its own scrolling and give it a fixed or constrained height.
Example of correct vs broken virtualization in WPF:
<!-- Broken — StackPanel forces full measure -->
<StackPanel>
    <ListView ItemsSource="{Binding Orders}" />
</StackPanel>

<!-- Correct — ListView owns its viewport -->
<ListView ItemsSource="{Binding Orders}"
          VirtualizingPanel.IsVirtualizing="True"
          VirtualizingPanel.VirtualizationMode="Recycling"
          ScrollViewer.IsDeferredScrollingEnabled="True" />
Example of incremental loading for large remote datasets in WinUI 3:
public class OrdersCollection : ObservableCollection<Order>,
    ISupportIncrementalLoading
{
    private int _page = 0;
    public bool HasMoreItems { get; private set; } = true;

    public IAsyncOperation<LoadMoreItemsResult> LoadMoreItemsAsync(uint count)
    {
        return AsyncInfo.Run(async token =>
        {
            var items = await _api.GetOrdersAsync(++_page, (int)count);
            HasMoreItems = items.Any();
            foreach (var item in items) Add(item);
            return new LoadMoreItemsResult { Count = (uint)items.Count };
        });
    }
}
Example of data virtualization in Avalonia with VirtualizingStackPanel:
<ListBox ItemsSource="{Binding LargeDataset}">
    <ListBox.ItemsPanel>
        <ItemsPanelTemplate>
            <VirtualizingStackPanel />
        </ItemsPanelTemplate>
    </ListBox.ItemsPanel>
    <ListBox.ItemTemplate>
        <DataTemplate>
            <TextBlock Text="{Binding Name}" />
        </DataTemplate>
    </ListBox.ItemTemplate>
</ListBox>
For data grids with large datasets, UI virtualization handles visible rows, but sorting and filtering still operate on the full collection. Use ICollectionView in WPF or AdvancedCollectionView in WinUI 3 to delegate sort and filter operations rather than rebuilding the bound collection, keeping the virtualization pipeline intact.
What .NET engineers should know:
- 👼 Junior: Never wrap a
ListVieworListBoxin aStackPanelor outerScrollViewer— it disables virtualization and causes severe performance issues with large datasets. - 🎓 Middle: Use
VirtualizationMode.RecyclingoverStandardin WPF for better scroll performance, implementISupportIncrementalLoadingin WinUI 3 for remote datasets, and keepDataTemplatelightweight — complex nested layouts in item templates multiply render cost across every visible row. - 👑 Senior: Distinguish UI virtualization from data virtualization — UI virtualization recycles controls in the viewport, data virtualization pages data from the source on demand. Large enterprise grids need both, and choosing the right collection abstraction (
ICollectionView,ISupportIncrementalLoading, or a custom paging ViewModel) is an architectural decision made before binding, not after performance problems appear.
❓ What is composition-based rendering, and how does it improve animation performance in WinUI 3?
Composition-based rendering means UI elements are broken into independent layers — called visuals — that the GPU composites together rather than the CPU redrawing the entire scene on every frame. WinUI 3 builds on the Windows Composition API (Microsoft.UI.Composition), where each visual lives on the compositor thread, separate from the UI thread. Animations and transforms driven by the compositor run at 60fps even when the UI thread is busy processing events or data — the animation never blocks, and the UI thread never blocks the animation.
Example of a compositor-driven animation bypassing the UI thread:
public void AttachFadeAnimation(UIElement element)
{
    var compositor = ElementCompositionPreview.GetElementVisual(element).Compositor;

    var fadeAnimation = compositor.CreateScalarKeyFrameAnimation();
    fadeAnimation.InsertKeyFrame(0f, 0f);
    fadeAnimation.InsertKeyFrame(1f, 1f);
    fadeAnimation.Duration = TimeSpan.FromMilliseconds(300);

    var visual = ElementCompositionPreview.GetElementVisual(element);
    visual.StartAnimation("Opacity", fadeAnimation);
}
Example of an expression animation tying scroll position to a parallax effect:
public void AttachParallax(UIElement background, ScrollViewer scroller)
{
    var scrollProps = ElementCompositionPreview
        .GetScrollViewerManipulationPropertySet(scroller);

    var compositor = scrollProps.Compositor;
    var parallax = compositor.CreateExpressionAnimation(
        "scroll.Translation.Y * 0.4");

    parallax.SetReferenceParameter("scroll", scrollProps);

    var bgVisual = ElementCompositionPreview.GetElementVisual(background);
    bgVisual.StartAnimation("Offset.Y", parallax);
}
Expression animations are particularly powerful — they define a mathematical relationship between properties evaluated every frame by the compositor with no round-trips to the UI thread. Parallax scrolling, sticky headers, and spring physics all become GPU-driven behaviors expressed as formulas rather than event handlers.
What .NET engineers should know:
- 👼 Junior: WinUI 3 animations driven by the Composition API run on the compositor thread — they stay smooth even when the UI thread is busy, unlike XAML storyboard animations, which can stutter under load.
- 🎓 Middle: Use
ElementCompositionPreview.GetElementVisual()to bridge XAML elements into the composition tree, and preferKeyFrameAnimationandExpressionAnimationoverStoryboardfor any performance-critical animation, the compositor thread guarantee is only available through the Composition API. - 👑 Senior: Design animation-heavy surfaces around the compositor from the start — identify which properties can be driven by expression animations versus requiring UI thread callbacks, and avoid
CompositionTarget.Renderingas a frame hook, since it pulls animation logic back onto the UI thread and loses the compositor thread's benefits.
📚 Resources: ElementCompositionPreview Class
❓ How do you profile and diagnose UI thread jank in desktop applications?
UI thread jank — missed frames, stuttering animations, unresponsive input — almost always comes from one root cause: synchronous work on the UI thread that takes longer than one frame budget (16ms at 60fps). Diagnosing it means identifying what's running on the UI thread that shouldn't be, which requires a profiler rather than guesswork. The right tool depends on the framework and platform.
For WPF and WinUI 3 on Windows, the Visual Studio Diagnostic Tools and PerfView are the primary options. PerfView's CPU stacks view shows exactly which methods are consuming UI thread time during a jank event. For MAUI, platform-specific profilers are more useful — Android Studio CPU Profiler for Android targets, Xcode Instruments for iOS. Avalonia's headless renderer can be used to benchmark layout and render passes in isolation.
Example of moving expensive work off the UI thread:
// Before — blocks UI thread during filter
private void SearchBox_TextChanged(object sender, TextChangedEventArgs e)
{
    Results = _allItems.Where(x => x.Name.Contains(e.NewText)).ToList();
    ResultsList.ItemsSource = Results;
}

// After — filter on background, update on UI thread
private async void SearchBox_TextChanged(object sender, TextChangedEventArgs e)
{
    var query = e.NewText;
    var filtered = await Task.Run(() =>
        _allItems.Where(x => x.Name.Contains(query)).ToList());

    ResultsList.ItemsSource = filtered;
}
Common junk sources beyond obvious blocking calls: XAML layout passes triggered by visibility changes on large trees, ObservableCollection bulk updates firing CollectionChanged per item instead of in batch, synchronous image loading, and overly complex DataTemplate hierarchies measuring nested controls on every scroll tick. Each requires a different fix — batched collection updates via AddRange, image caching, flattened templates, and deferred layout, respectively.
What .NET engineers should know:
- 👼 Junior: Never run I/O, database queries, or CPU-heavy filtering on the UI thread — if the app freezes during user interaction, work is blocking the UI thread and needs
Task.Run. - 🎓 Middle: Use PerfView or Visual Studio CPU profiler to capture UI thread call stacks during a jank event — identify the specific method crossing the 16ms frame budget rather than guessing, and check
ObservableCollectionupdate patterns as a common culprit in data-heavy views. - 👑 Senior: Establish a frame budget policy enforced by automated profiling in CI — use ETW traces or platform profiler snapshots to detect regressions before they ship, and audit
DataTemplatecomplexity and layout pass counts for list-heavy surfaces as part of performance review.
📚 Resources: Overview of the profiling tools (C#, Visual Basic, C++, F#)
❓ What is ahead-of-time (AOT) compilation, and how does it affect desktop app startup and size?
AOT compilation converts .NET IL bytecode to native machine code at publish time rather than at runtime via the JIT compiler. The result is an executable that contains native code ready to run immediately — no JIT warmup, no runtime IL interpretation. For desktop apps, this means faster cold-launch times and more predictable startup performance, at the cost of larger binaries and longer build times.
The traditional .NET startup sequence — load runtime, JIT-compile hot paths, initialize reflection metadata — adds hundreds of milliseconds to cold launch. AOT eliminates the JIT phase entirely. For WinUI 3 and MAUI apps where first-paint latency is visible to users, this is a meaningful improvement. The trade-off is binary size: AOT includes precompiled native code for all reachable methods, which significantly increases the output size compared to a trimmed IL assembly.
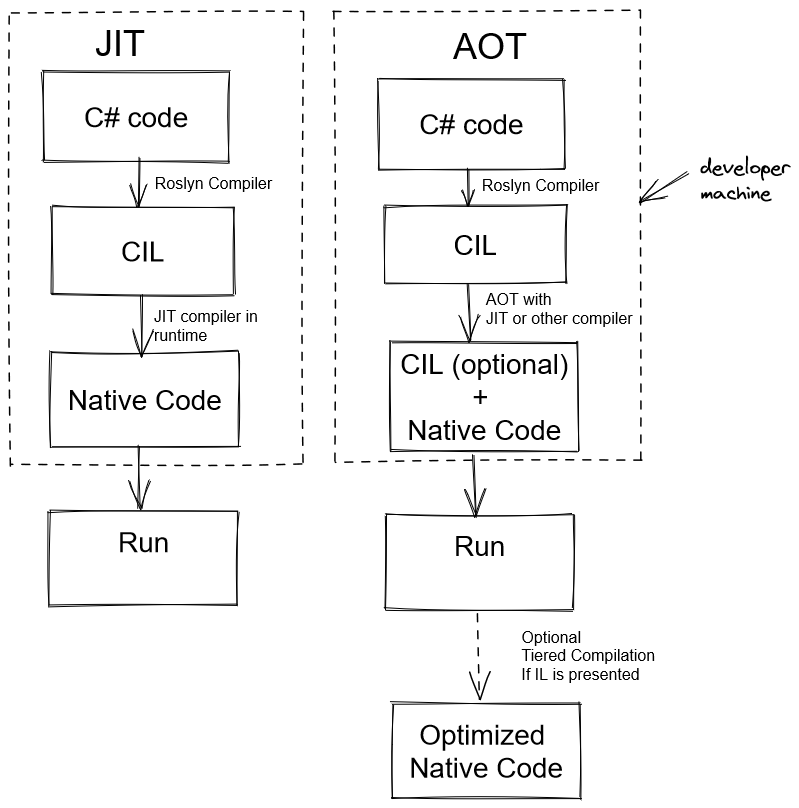
AOT compatibility requires eliminating runtime reflection, dynamic type loading, and dynamic keyword usage — the trimmer removes unreachable code and AOT cannot compile what it cannot see statically. Libraries that rely heavily on reflection — some ORMs, serializers, and DI containers — need AOT annotations or source-generated alternatives like System.Text.Json source generation.
What .NET engineers should know:
- 👼 Junior: AOT compiles your app to native code at publish time — startup is faster because there's no JIT warmup, but the binary is larger and build times are longer.
- 🎓 Middle: Audit reflection usage before enabling AOT — replace
Activator.CreateInstance, dynamic serialization, and reflection-based DI registrations with source-generated or statically typed alternatives, and use the trimmer warnings as a checklist of AOT incompatibilities. - 👑 Senior: Treat AOT compatibility as an architectural constraint established at project start — retrofitting it onto a mature codebase with reflection-heavy libraries is expensive. Evaluate startup time budgets against binary size growth and build time cost, and use ReadyToRun as a middle ground when full NativeAOT compatibility is not achievable.
Data, Storage, and Integration

❓ How do you design a desktop app that works offline and syncs later?
Offline-first design means the app is fully functional without a network connection — reads come from local storage, writes go to local storage first, and sync to the remote is a background concern the user shouldn't need to think about. This is an architectural commitment, not a feature added later. Retrofitting offline support onto an app designed to call APIs directly is significantly more expensive than designing for it from the start.
The architecture has four layers: a local SQLite store as the system of record for the UI, a sync engine that reconciles local and remote state, a connectivity monitor that triggers or pauses sync, and a conflict resolution policy that decides what happens when the same record is modified in both places simultaneously.
Example of a connectivity-aware sync trigger:
public class ConnectivityMonitor
{
    public bool IsOnline => Connectivity.Current.NetworkAccess == NetworkAccess.Internet;

    public ConnectivityMonitor()
    {
        Connectivity.Current.ConnectivityChanged += OnConnectivityChanged;
    }

    private void OnConnectivityChanged(object? sender, ConnectivityChangedEventArgs e)
    {
        var online = e.NetworkAccess == NetworkAccess.Internet;
        WeakReferenceMessenger.Default.Send(new ConnectivityChangedMessage(online));
    }
}
Example of a local-first entity with sync metadata:
public class Order
{
    public Guid Id { get; set; } = Guid.NewGuid();
    public string CustomerName { get; set; } = string.Empty;
    public decimal Total { get; set; }
    public DateTime UpdatedAt { get; set; }

    // Sync tracking
    public SyncStatus SyncStatus { get; set; } = SyncStatus.Pending;
    public DateTime? LastSyncedAt { get; set; }
    public bool IsDeleted { get; set; } // soft delete for sync tombstoning
}

public enum SyncStatus { Pending, Synced, Failed, Conflict }
Example of a sync engine with conflict detection:
public class OrderSyncEngine
{
    private readonly IDbContextFactory<AppDbContext> _dbFactory;
    private readonly IOrderApiClient _api;
    private readonly IMessenger _messenger;

    public async Task SyncAsync(CancellationToken token = default)
    {
        await PushPendingAsync(token);
        await PullRemoteAsync(token);
        _messenger.Send(new SyncCompletedMessage());
    }

    private async Task PushPendingAsync(CancellationToken token)
    {
        await using var db = _dbFactory.CreateDbContext();
        var pending = await db.Orders
            .Where(o => o.SyncStatus == SyncStatus.Pending)
            .ToListAsync(token);

        foreach (var order in pending)
        {
            try
            {
                await _api.UpsertAsync(order.ToDto(), token);
                order.SyncStatus = SyncStatus.Synced;
                order.LastSyncedAt = DateTime.UtcNow;
            }
            catch (ConflictException)
            {
                order.SyncStatus = SyncStatus.Conflict;
            }
            catch { order.SyncStatus = SyncStatus.Failed; }
        }
        await db.SaveChangesAsync(token);
    }

    private async Task PullRemoteAsync(CancellationToken token)
    {
        await using var db = _dbFactory.CreateDbContext();
        var lastSync = await db.SyncCheckpoints
            .Select(c => c.LastPullAt)
            .FirstOrDefaultAsync(token);

        var remoteChanges = await _api.GetChangedSinceAsync(lastSync, token);

        foreach (var dto in remoteChanges)
        {
            var local = await db.Orders.FindAsync([dto.Id], token);

            if (local is null)
            {
                db.Orders.Add(dto.ToEntity(SyncStatus.Synced));
            }
            else if (local.SyncStatus == SyncStatus.Pending)
            {
                // Conflict — local unsynced change vs remote change
                local.SyncStatus = SyncStatus.Conflict;
            }
            else if (dto.UpdatedAt > local.UpdatedAt)
            {
                local.ApplyRemoteUpdate(dto);
                local.SyncStatus = SyncStatus.Synced;
            }
        }

        db.SyncCheckpoints.UpdateLastPullAt(DateTime.UtcNow);
        await db.SaveChangesAsync(token);
    }
}
Example of surfacing sync status in the UI:
public partial class OrderListViewModel : ObservableObject,
    IRecipient<SyncCompletedMessage>,
    IRecipient<ConnectivityChangedMessage>
{
    [ObservableProperty] private bool _isOnline;
    [ObservableProperty] private int _pendingCount;

    public OrderListViewModel(IMessenger messenger)
    {
        messenger.RegisterAll(this);
        IsOnline = Connectivity.Current.NetworkAccess == NetworkAccess.Internet;
    }

    public void Receive(ConnectivityChangedMessage m) => IsOnline = m.IsOnline;

    public async void Receive(SyncCompletedMessage m)
    {
        await LoadOrdersCommand.ExecuteAsync(null);
        await UpdatePendingCountAsync();
    }
}
Soft deletes — marking records as IsDeleted Rather than removing them from the database, they are essential for sync correctness. A hard delete leaves no tombstone, so the sync engine cannot tell remote peers that the record should be removed. Soft deletes propagate deletions through the sync pipeline and can be purged after confirmed remote acknowledgment.
What .NET engineers should know:
- 👼 Junior: The UI always reads from local SQLite — write operations go to local storage first with a
SyncStatus.Pendingflag, and the sync engine handles pushing them to the remote in the background. - 🎓 Middle: Implement soft deletes for all syncable entities, use a sync checkpoint timestamp to bound pull queries to changed records only, and expose sync status per-entity in the UI so users can see what's pending — invisible sync state leads to user confusion and duplicate data entry.
- 👑 Senior: Define conflict resolution policy explicitly before writing any sync code — last-write-wins by timestamp is simple but lossy; field-level merge preserves more data but is complex to implement and test. Build sync observability with structured logging from day one, implement exponential backoff with jitter for failed pushes, and design the checkpoint mechanism to be idempotent so interrupted syncs can safely resume without duplicating records.
❓ How do you use SQLite with EF Core in a desktop application for local-first data storage?
SQLite via EF Core is the standard local-first storage solution for desktop apps — it's embedded, zero-configuration, and ships as a NuGet package. The database is a single file on disk, making it trivially portable and easy to back up or sync. EF Core's SQLite provider handles schema creation, migrations, and LINQ queries against that file with the same API surface as any other EF Core provider.
The main desktop-specific concern is the placement of database files. Never write to the app's install directory — it may be read-only in packaged apps. Use Environment.GetFolderPath(Environment.SpecialFolder.LocalApplicationData) for unpackaged apps or ApplicationData.Current.LocalFolder for packaged WinUI 3 apps to get a writable per-user location.
Example of DbContext setup and file path resolution:
public class AppDbContext : DbContext
{
    public DbSet<Product> Products => Set<Product>();
    public DbSet<Order> Orders => Set<Order>();

    protected override void OnConfiguring(DbContextOptionsBuilder options)
    {
        var folder = Environment.GetFolderPath(
            Environment.SpecialFolder.LocalApplicationData);
        var dbPath = Path.Combine(folder, "MyApp", "app.db");

        Directory.CreateDirectory(Path.GetDirectoryName(dbPath)!);
        options.UseSqlite($"Data Source={dbPath}");
    }
}
Example of registering DbContext in DI and applying migrations at startup:
// MauiProgram.cs / App.xaml.cs
builder.Services.AddDbContextFactory<AppDbContext>();

// Apply migrations on first launch
public partial class App : Application
{
    private readonly IDbContextFactory<AppDbContext> _dbFactory;

    public App(IDbContextFactory<AppDbContext> dbFactory)
    {
        _dbFactory = dbFactory;
        using var db = _dbFactory.CreateDbContext();
        db.Database.Migrate();
    }
}
Example of using DbContextFactory in a ViewModel to avoid threading issues:
public partial class ProductViewModel : ObservableObject
{
    private readonly IDbContextFactory<AppDbContext> _dbFactory;

    public ProductViewModel(IDbContextFactory<AppDbContext> dbFactory)
        => _dbFactory = dbFactory;

    [RelayCommand]
    private async Task LoadProductsAsync()
    {
        await using var db = _dbFactory.CreateDbContext();
        Products = await db.Products
            .Where(p => p.IsActive)
            .OrderBy(p => p.Name)
            .ToObservableCollection();
    }
}
IDbContextFactory<T> is preferable over injecting DbContext directly in desktop apps — DbContext is not thread-safe, and desktop ViewModels often trigger concurrent async operations. The factory creates a fresh context for each operation, eliminating concurrency issues without requiring manual lifetime management.
What .NET engineers should know:
- 👼 Junior: Add
Microsoft.EntityFrameworkCore.SqliteNuGet, create aDbContext, calldb.Database.Migrate()at startup, and store the.dbfile inLocalApplicationData— never in the app install folder. - 🎓 Middle: Register
IDbContextFactory<T>instead ofDbContextdirectly — create and dispose a context per operation in ViewModels to avoid threading issues and stale change tracker state across navigation. - 👑 Senior: Design the migration strategy for deployed apps carefully —
Migrate()at startup, it is simple but can block launch on large schemas; consider background migration with a version gate, and plan for conflict resolution if the database is synced across devices via cloud storage.
📚 Resources:
❓ How do you integrate REST or gRPC service calls into a desktop app without blocking the UI thread?
REST and gRPC calls in desktop apps follow the same non-blocking rule as any I/O — all network calls go through async/await on background threads, results are applied to the UI thread, and the ViewModel exposes loading and error state so the UI reflects what's happening. The difference between REST and gRPC is mostly the client setup; the async threading model is identical.
For REST, HttpClient is registered as a singleton or via IHttpClientFactory to avoid socket exhaustion from repeated instantiation. For gRPC, the generated client from Grpc.Net.Client is similarly long-lived. Both should live behind a service interface injected into ViewModels — the ViewModel never references HttpClient or gRPC stubs directly.
Example of a typed REST client behind an interface:
public interface IProductService
{
    Task<IEnumerable<ProductDto>> GetProductsAsync(CancellationToken token = default);
    Task<ProductDto> CreateProductAsync(CreateProductRequest request, CancellationToken token = default);
}

public class ProductApiClient : IProductService
{
    private readonly HttpClient _http;
    public ProductApiClient(HttpClient http) => _http = http;

    public async Task<IEnumerable<ProductDto>> GetProductsAsync(CancellationToken token = default)
        => await _http.GetFromJsonAsync<IEnumerable<ProductDto>>("api/products", token)
           ?? Enumerable.Empty<ProductDto>();

    public async Task<ProductDto> CreateProductAsync(CreateProductRequest request, CancellationToken token = default)
    {
        var response = await _http.PostAsJsonAsync("api/products", request, token);
        response.EnsureSuccessStatusCode();
        return (await response.Content.ReadFromJsonAsync<ProductDto>(cancellationToken: token))!;
    }
}
Example of a ViewModel consuming the service with cancellation and error state:
public partial class ProductListViewModel : ObservableObject
{
    private readonly IProductService _service;
    private CancellationTokenSource? _cts;

    [ObservableProperty] private bool _isLoading;
    [ObservableProperty] private string? _errorMessage;
    [ObservableProperty] private IEnumerable<ProductDto> _products = [];

    public ProductListViewModel(IProductService service) => _service = service;

    [RelayCommand]
    private async Task LoadAsync()
    {
        _cts?.Cancel();
        _cts = new CancellationTokenSource();

        IsLoading = true;
        ErrorMessage = null;

        try
        {
            Products = await _service.GetProductsAsync(_cts.Token);
        }
        catch (OperationCanceledException) { }
        catch (Exception ex) { ErrorMessage = ex.Message; }
        finally { IsLoading = false; }
    }
}
Cancellation token propagation through every layer, from the ViewModel to the service to the HTTP/gRPC client, is critical for desktop apps, where navigation away from a page should cancel in-flight requests rather than letting them complete and write to a disposed ViewModel.
What .NET engineers should know:
- 👼 Junior: Always
awaitHTTP and gRPC calls — never.Resultor.Wait()on the UI thread, and registerHttpClientas a singleton or viaIHttpClientFactory, nevernew HttpClient()per call. - 🎓 Middle: Propagate
CancellationTokenfrom the ViewModel command through the service interface to the HTTP/gRPC client — cancel on navigation away or re-invocation, and exposeIsLoadingandErrorMessageas observable properties bound to the UI rather than handling errors in code-behind. - 👑 Senior: Design the service layer with resilience from the start — add retry policies via Polly for transient failures, circuit breakers for degraded backends, and offline fallback to local SQLite cache for network-unavailable scenarios, all behind the service interface so ViewModels stay unaware of retry or caching logic.
📚 Resources:
❓ How do you handle secure credential storage in desktop applications across platforms?
Secure credential storage means never writing passwords, tokens, or API keys to plain files, app settings, or registry strings. Each platform provides a native secure store backed by OS-level encryption: Windows Credential Manager, macOS Keychain, and Linux Secret Service (via libsecret). The right approach abstracts these behind a service interface and uses the platform store rather than rolling custom encryption.
In MAUI, SecureStorage from MAUI Essentials wraps all three platform stores behind a single API — the simplest cross-platform option when targeting mobile and desktop together. For WinUI 3 or WPF targeting Windows only, Windows.Security.Credentials.PasswordVault is the native API. For Avalonia targeting all desktop platforms, a library like Meziantou.Framework.Win32.CredentialManager or SecretService bindings handles the per-platform differences.
Example of MAUI SecureStorage for cross-platform credential storage:
public class SecureCredentialService : ICredentialService
{
    private const string TokenKey = "auth_token";
    private const string RefreshKey = "refresh_token";

    public async Task SaveTokensAsync(string accessToken, string refreshToken)
    {
        await SecureStorage.Default.SetAsync(TokenKey, accessToken);
        await SecureStorage.Default.SetAsync(RefreshKey, refreshToken);
    }

    public async Task<string?> GetAccessTokenAsync() =>
        await SecureStorage.Default.GetAsync(TokenKey);

    public void ClearTokens() => SecureStorage.Default.RemoveAll();
}
Example of Windows Credential Manager via PasswordVault in WinUI 3:
public class WindowsCredentialService : ICredentialService
{
    private const string Resource = "MyApp.AuthToken";
    private readonly PasswordVault _vault = new();

    public void SaveToken(string username, string token)
        => _vault.Add(new PasswordCredential(Resource, username, token));

    public string? GetToken(string username)
    {
        try
        {
            var credential = _vault.Retrieve(Resource, username);
            credential.RetrievePassword();
            return credential.Password;
        }
        catch (Exception) { return null; }
    }

    public void ClearToken(string username)
    {
        try
        {
            var credential = _vault.Retrieve(Resource, username);
            _vault.Remove(credential);
        }
        catch (Exception) { }
    }
}
Example of registering the credential service conditionally per platform in MAUI:
// MauiProgram.cs
#if WINDOWS
builder.Services.AddSingleton<ICredentialService, WindowsCredentialService>();
#else
builder.Services.AddSingleton<ICredentialService, SecureCredentialService>();
#endif
A common mistake is storing tokens in Preferences or app.config — both write plain text to disk. Another is caching credentials in the ViewModel or in static properties for longer than necessary. Retrieve from the secure store on demand and discard from memory after use.
What .NET engineers should know:
- 👼 Junior: Use
SecureStoragein MAUI for cross-platform token storage — never store credentials inPreferences, app settings files, or static fields. - 🎓 Middle: Understand what each platform store protects — Windows PasswordVault encrypts per-user via DPAPI, macOS Keychain encrypts per-app, but neither protects against a compromised process running as the same user — complement with short token lifetimes and refresh token rotation.
- 👑 Senior: Design the credential lifecycle explicitly — store only the minimum (refresh token, not long-lived secrets), implement token refresh transparently in the HTTP client pipeline via a
DelegatingHandler, and handle secure storage unavailability gracefully on platforms where it may be restricted by enterprise policy.
📚 Resources:
❓ How do you implement background sync between local storage and a remote API in a desktop app?
Background sync means keeping local SQLite data consistent with a remote API without blocking the UI or requiring the user to manually refresh. The pattern combines a local-first read model — the UI always reads from SQLite — with a background worker that pushes local changes up and pulls remote changes down on a schedule or trigger. The UI never waits for network; it responds to local state changes that the sync worker updates underneath it.
The core components are a sync service running on a background thread, a change-tracking mechanism to identify what needs to be pushed, and an observable notification path back to the UI when pulled data arrives. IHostedService or a dedicated BackgroundService from Microsoft.Extensions.Hosting is the cleanest host for the sync loop in a desktop app that already uses the generic host.
Example of a background sync service using IHostedService:
public class SyncBackgroundService : BackgroundService
{
    private readonly IDbContextFactory<AppDbContext> _dbFactory;
    private readonly IProductService _api;
    private readonly IMessenger _messenger;

    public SyncBackgroundService(
        IDbContextFactory<AppDbContext> dbFactory,
        IProductService api,
        IMessenger messenger)
    {
        _dbFactory = dbFactory;
        _api = api;
        _messenger = messenger;
    }

    protected override async Task ExecuteAsync(CancellationToken stoppingToken)
    {
        while (!stoppingToken.IsCancellationRequested)
        {
            await SyncAsync(stoppingToken);
            await Task.Delay(TimeSpan.FromMinutes(5), stoppingToken);
        }
    }

    private async Task SyncAsync(CancellationToken token)
    {
        await PushLocalChangesAsync(token);
        await PullRemoteChangesAsync(token);
        _messenger.Send(new SyncCompletedMessage());
    }
}
Example of push/pull with conflict tracking via timestamp:
private async Task PushLocalChangesAsync(CancellationToken token)
{
    await using var db = _dbFactory.CreateDbContext();
    var pending = await db.Products
        .Where(p => p.SyncStatus == SyncStatus.Pending)
        .ToListAsync(token);

    foreach (var product in pending)
    {
        try
        {
            await _api.UpsertProductAsync(product.ToDto(), token);
            product.SyncStatus = SyncStatus.Synced;
        }
        catch { product.SyncStatus = SyncStatus.Failed; }
    }
    await db.SaveChangesAsync(token);
}

private async Task PullRemoteChangesAsync(CancellationToken token)
{
    await using var db = _dbFactory.CreateDbContext();
    var lastSync = await db.SyncMetadata
        .Select(m => m.LastPullAt)
        .FirstOrDefaultAsync(token);

    var remote = await _api.GetProductsModifiedSinceAsync(lastSync, token);

    foreach (var dto in remote)
    {
        var local = await db.Products.FindAsync([dto.Id], token);
        if (local is null)
            db.Products.Add(dto.ToEntity(SyncStatus.Synced));
        else if (dto.UpdatedAt > local.UpdatedAt)
            local.ApplyRemoteUpdate(dto);
    }

    db.SyncMetadata.UpdateLastPullAt(DateTime.UtcNow);
    await db.SaveChangesAsync(token);
}
Example of the ViewModel reacting to sync completion via messaging:
public partial class ProductListViewModel : ObservableObject,
    IRecipient<SyncCompletedMessage>
{
    public ProductListViewModel(IMessenger messenger)
        => messenger.RegisterAll(this);

    public async void Receive(SyncCompletedMessage message)
        => await LoadProductsCommand.ExecuteAsync(null);
}
Conflict resolution policy needs a deliberate decision before implementation: last-write-wins by timestamp is simple but loses concurrent edits; server-wins is safe but frustrating for offline users; merge strategies are correct but complex. Most desktop apps with occasional connectivity choose last-write-wins with a SyncStatus flag on every entity to track pending, synced, and failed states.
What .NET engineers should know:
- 👼 Junior: The UI always reads from the local SQLite database — the sync worker updates it in the background and notifies the UI via messaging when new data arrives.
- 🎓 Middle: Track sync state per entity with a
SyncStatusenum, useIDbContextFactoryin the background service to avoid cross-thread DbContext issues, and propagateCancellationTokenthrough every async call, so sync stops cleanly on app shutdown. - 👑 Senior: Define conflict resolution policy explicitly before writing sync code — timestamp-based last-write-wins, server-authoritative, or field-level merge each have different complexity and data loss profiles. Also implement exponential backoff for failed pushes, dead-letter storage for records that permanently fail, and sync observability via structured logs to diagnose production data consistency issues.
Distribution and Updates

❓ What are the options for auto-updating a desktop application, and how do you implement them in .NET?
Auto-update in desktop apps comes down to three approaches: platform-managed updates via the Microsoft Store (MSIX), self-managed updates via a dedicated update framework, or custom update logic built on raw HTTP. The right choice depends on the distribution channel, the level of control over update timing needed, and whether the app is packaged.
MSIX packaged apps distributed via the Store get updates automatically — Windows checks periodically and applies updates in the background. For enterprise sideloaded MSIX apps, PackageManager API handles update checks against an AppInstaller manifest. For unpackaged apps or apps distributed outside the Store, Velopack and Squirrel.Windows and the .NET ecosystem — both handle delta updates, rollback, and installer generation.
Example of checking for updates with an AppInstaller manifest (packaged MSIX):
public async Task<bool> CheckForUpdatesAsync()
{
    var updateManager = await PackageUpdateAvailabilityResult
        .GetUpdateAvailabilityAsync();

    return updateManager.Availability
        is PackageUpdateAvailability.Available
        or PackageUpdateAvailability.Required;
}
Example of Velopack integration for unpackaged or self-distributed apps:
// Program.cs — must run before anything else
public static void Main(string[] args)
{
    VelopackApp.Build().Run();

    WinRT.ComWrappersSupport.InitializeComWrappers();
    Application.Start(_ => new App());
}

// Update check service
public class UpdateService
{
    private readonly UpdateManager _manager;

    public UpdateService()
    {
        _manager = new UpdateManager("https://myapp.com/releases/");
    }

    public async Task<bool> CheckAndApplyUpdatesAsync()
    {
        var newVersion = await _manager.CheckForUpdatesAsync();
        if (newVersion is null) return false;

        await _manager.DownloadUpdatesAsync(newVersion);
        _manager.ApplyUpdatesAndRestart(newVersion);
        return true;
    }
}
Example of wiring the update check into app startup with user notification:
public partial class MainWindow : Window
{
    private readonly UpdateService _updater;
    private readonly IDialogService _dialogs;

    protected override async void OnLoaded(object sender, RoutedEventArgs e)
    {
        await Task.Delay(3000); // defer past first paint
        var updateAvailable = await _updater.CheckAndApplyUpdatesAsync();

        if (updateAvailable)
            await _dialogs.ShowAlertAsync("Update", "App will restart to apply update.");
    }
}
For CI/CD, Velopack's CLI (vpk) generates the release artifacts — delta packages, full installers, and the releases.json manifest — as part of the publish pipeline. The update server is just a static file host; no server-side logic is required.
What .NET engineers should know:
- 👼 Junior: MSIX apps distributed via the Store update automatically — for everything else, use Velopack or a similar framework rather than building custom update logic from scratch.
- 🎓 Middle: Defer the update check a few seconds after first paint so it doesn't compete with startup performance, give users visibility into the update process via progress and confirmation dialogs, and always test the rollback path — a bad update that can't roll back destroys user trust fast.
- 👑 Senior: Design the update strategy around your deployment model upfront — Store vs. sideloaded MSIX vs. unpackaged each have different update APIs, signing requirements, and enterprise IT constraints. Integrate artifact update generation into CI, enforce semantic versioning, and implement staged rollouts via a custom release manifest to limit the blast radius of a bad release.
📚 Resources:
❓ How does MSIX packaging affect installation, updates, and sandboxing on Windows?
MSIX is a container format that fundamentally changes how Windows apps install, run, and update compared to classic MSI or xcopy deployment. Installation is atomic — either the full package installs successfully or nothing changes on the system, eliminating the partial-install failures common with legacy installers. Uninstall is equally clean: MSIX tracks every file and registry write, leaving no orphaned entries behind. From an IT perspective, this makes MSIX the most predictable Windows deployment format available.
Updates in MSIX work through block-level delta patching — only the changed blocks of the package are downloaded, not the full installer. For apps distributed via the Store, this happens silently in the background. For enterprise sideloaded apps via AppInstaller, the OS checks the manifest URL on launch and applies updates on a configurable schedule. The app always runs the installed version; the update is staged and applied on the next launch without interrupting the current session.
Example of configuring auto-update behavior in an AppInstaller file:
<?xml version="1.0" encoding="utf-8"?>
<AppInstaller Uri="https://myapp.com/releases/MyApp.appinstaller"
              Version="1.2.0.0"
              xmlns="http://schemas.microsoft.com/appx/appinstaller/2018">
  <MainPackage Name="com.mycompany.myapp"
               Version="1.2.0.0"
               Publisher="CN=MyCompany"
               Uri="https://myapp.com/releases/MyApp.msix" />
  <UpdateSettings>
    <OnLaunch HoursBetweenUpdateChecks="12" />
    <AutomaticBackgroundTask />
    <ForceUpdateFromAnyVersion>true</ForceUpdateFromAnyVersion>
  </UpdateSettings>
</AppInstaller>
The sandboxing model is the most impactful behavioral difference for developers. MSIX apps run in a virtualization layer — filesystem writes that target system locations are redirected to a per-package VFS folder, and registry writes outside HKCU\Software\Classes are virtualized similarly. This means the app cannot accidentally pollute the system state, but it also means legacy code that writes to Program Files or HKLM silently gets redirected, which can cause hard-to-diagnose bugs if the app expects those writes to be visible system-wide.
Example of detecting virtualized paths at runtime to avoid redirect surprises:
// Always use known folder APIs — never hardcode paths
var localData = Environment.GetFolderPath(
    Environment.SpecialFolder.LocalApplicationData);

// For packaged apps — use ApplicationData for full WinRT path access
var packagedLocalData = ApplicationData.Current.LocalFolder.Path;

// Avoid — may be virtualized in MSIX context
var badPath = @"C:\Program Files\MyApp\data.db";
Capabilities declared in the package manifest grant access to protected resources: camera, microphone, location, and broad filesystem access, all of which require explicit <Capability> declarations. Attempting to access these without a declaration fails silently or throws an access-denied error rather than prompting the user, unlike in UWP, where the OS prompts automatically.
What .NET engineers should know:
- 👼 Junior: MSIX installs atomically, uninstalls cleanly, and updates via delta patches — file and registry writes are virtualized so the app cannot pollute system state, but also cannot write to system locations expecting other processes to see those writes.
- 🎓 Middle: Audit all file and registry access paths before packaging — replace hardcoded system paths with
Environment.GetFolderPathorApplicationDataAPIs, and declare all required capabilities in the manifest upfront, since missing declarations cause silent access failures rather than user prompts. - 👑 Senior: Evaluate MSIX sandboxing impact on legacy codebases carefully — virtualized registry and filesystem redirects can silently break inter-process communication, shared config files, and COM registration that worked fine as an MSI. Use the MSIX Packaging Tool's fixup runtime shims for compatibility issues that cannot be refactored, and test the full install, update, and uninstall lifecycle in CI against clean VMs rather than developer machines.
❓ What is the difference between packaged and unpackaged WinUI 3 deployment, and what capabilities does each unlock?
Packaged deployment wraps the app in an MSIX container giving it a package identity — a cryptographically verified name, publisher, and version tuple that Windows uses to gate access to protected APIs. Unpackaged deployment is a plain Win32 executable with no identity, deployed like a classic desktop app. The Windows App SDK supports both, but the API surface available differs meaningfully between them.
Package identity is the key that unlocks OS integration features. Push notifications, background tasks, protocol, and file association activation, per-app settings isolation via ApplicationData, Start menu pinning, and taskbar badges all require identity. Without it, the OS has no stable anchor to associate these features with a specific app. Unpackaged apps can access most Windows App SDK APIs but fall back to Win32 equivalents for identity-dependent features or skip them entirely.
Example of detecting package identity at runtime to branch behavior:
public static class DeploymentContext
{
    public static bool IsPackaged { get; } = GetIsPackaged();

    private static bool GetIsPackaged()
    {
        try { var _ = Package.Current; return true; }
        catch (InvalidOperationException) { return false; }
    }
}

// Branch on identity-dependent features
public class NotificationService
{
    public void Register()
    {
        if (DeploymentContext.IsPackaged)
            AppNotificationManager.Default.Register();
        else
            RegisterUnpackagedNotifications(); // COM activator path
    }
}
Example of sparse package identity — granting identity to an unpackaged app:
<!-- SparseManifest.appxmanifest — minimal identity without full MSIX -->
<Package xmlns="http://schemas.microsoft.com/appx/manifest/foundation/windows10">
  <Identity Name="com.mycompany.myapp"
            Publisher="CN=MyCompany"
            Version="1.0.0.0" />
  <Properties>
    <DisplayName>My App</DisplayName>
    <PublisherDisplayName>MyCompany</PublisherDisplayName>
    <Logo>Assets\Logo.png</Logo>
  </Properties>
  <Applications>
    <Application Id="App" Executable="MyApp.exe" EntryPoint="Windows.FullTrustApplication">
      <uap:VisualElements DisplayName="My App"
                          Square150x150Logo="Assets\Logo.png"
                          Square44x44Logo="Assets\Logo.png"
                          BackgroundColor="transparent" />
    </Application>
  </Applications>
</Package>
The capability comparison at a glance:
| Feature | Packaged | Unpackaged |
|---|---|---|
| Push notifications | ✅ | ⚠️ COM activator required |
| Background tasks | ✅ | ❌ |
| Protocol activation | ✅ | ❌ |
| ApplicationData API | ✅ | ❌ Use AppData folder |
| Auto-update via AppInstaller | ✅ | ❌ |
| Start menu / taskbar integration | ✅ | Limited |
| Full filesystem access | ✅ | ✅ |
| xcopy deployment | ❌ | ✅ |
| No installer required | ❌ | ✅ |
Sparse package identity is the middle ground — it registers a lightweight manifest that gives the unpackaged exe a package identity without wrapping it in a full MSIX. This unlocks most identity-dependent APIs while retaining xcopy-style deployment flexibility, at the cost of requiring a signed manifest registered on the target machine.
What .NET engineers should know:
- 👼 Junior: Packaged apps get automatic updates, Start menu integration, and full Windows API access — unpackaged apps are simpler to deploy, but miss OS integration features that require package identity.
- 🎓 Middle: Audit required API features before choosing deployment model — push notifications and background tasks require identity, and retrofitting packaging onto an unpackaged app mid-project is more disruptive than deciding upfront. Consider a sparse package identity as a compromise for apps that need identity APIs but cannot adopt full MSIX.
- 👑 Senior: The deployment model is an architectural decision with enterprise IT implications — MSIX requires signing infrastructure, Group Policy compatibility testing, and AppInstaller hosting; unpackaged requires custom update logic and loses OS integration depth. Define the deployment model in the project charter and validate it against IT requirements before committing to either path.
📚 Resources:
- Grant package identity by packaging with an external location manually
- Deployment architecture and overview for framework-dependent apps
❓ What are the real-world limitations of MSIX, and when would you avoid it?
MSIX's constraints are real and frequently underestimated. The sandboxing model that makes it clean to install is the same mechanism that breaks legacy code — filesystem virtualization, registry redirection, and capability-gated API access are architectural constraints, not configuration switches. Apps that worked fine as MSI installs often need non-trivial changes to run correctly as MSIX packages.
The most common breakages in practice: writing to shared locations expecting other processes to read those files (virtualized, invisible to other apps), COM servers registered for out-of-process activation (requires manifest declaration and packaging of the COM server), kernel drivers and system services (completely unsupported — MSIX cannot install drivers), and apps that self-update by overwriting their own binaries (blocked by package immutability).
When to avoid MSIX:
- App installs kernel drivers or system services
- App relies on out-of-process COM servers not easily repackaged
- Deployment target is a locked-down enterprise with restricted sideloading
- App uses shared filesystem locations for IPC with other processes
- The team has no code signing infrastructure and no timeline to build it
- App requires self-patching or in-place binary replacement
- Target machines run Windows 7/8 (MSIX requires Windows 10 1709+)
What .NET engineers should know:
- 👼 Junior: MSIX cannot install drivers, cannot self-patch binaries, and cannot write to shared system locations — if the app does any of these, MSIX is not viable without significant refactoring.
- 🎓 Middle: Validate MSIX compatibility against the specific enterprise deployment environment early — sideloading policy, certificate trust, and Intune/SCCM packaging requirements can block a fully working MSIX package from reaching target machines, regardless of technical correctness.
- 👑 Senior: Treat the packaging decision as an architectural risk item requiring explicit sign-off from IT, security, and DevOps before committing — the cost of discovering MSIX incompatibility after building the signing pipeline and rewriting shared COM infrastructure is significantly higher than evaluating it during project scoping. For high-friction scenarios, WiX with a modern UI bootstrapper or Velopack for unpackaged apps often delivers faster time to production with lower operational risk.
📚 Resources:
📖 Future reading
- Part 1: Core Language & Platform Fundamentals
- Part 2: Types and Type Features
- Part 3: Collections and Data Structures
- Part 4: Async & Parallel Programming
- Part 5: Design Patterns
- Part 6: ASP.NET Core
- Part 7: SQL Database
- Part 8: NoSQL Databases
- Part 9: Microservices and Distributed Systems
- Part 10: Testing
- Part 12: Mobile Development
- Part 13: AI
- Part 14: Agile & Scrum